Drawing people might seem intimidating at first—but with a bit of structure and the right breakdown, it’s one of the most rewarding subjects to sketch. Whether you're hoping to draw a quick figure or a more detailed portrait, this guide is made for beginners who want to gain confidence and structure in drawing human figures.
Let’s walk through the essential steps of drawing a person from scratch, explain common beginner mistakes, and explore some fun variations along the way.
Step 1: Sketch the Basic Proportions
Begin with the simplest version of the human figure: the stick figure. While it might sound basic, it’s a great way to practice understanding how different parts of the body relate in size and placement.
- Draw a vertical centerline for posture.
- Add a circle for the head.
- Use straight lines to represent the torso, arms, and legs.
Why this matters: You’re training your eyes to see overall proportion before getting caught in details.
Variation: Try drawing figures with different heights, stances, or gestures to warm up.
Common Mistake: Making the arms too short or the legs too long. Remember the midpoint of the body falls around the hips.
Step 2: Block In the Torso and Pelvis
Next, move on to simplifying the core of the body into blocks or shapes.
- Turn the upper torso into a rectangular box (ribcage area).
- Add a second, slightly wider box for the pelvis.
- Connect the two with a flexible line to represent the spine’s curve.
Why this matters: These blocks help build a 3D form and assist in visualizing the figure from any angle.
Variation: Try rotating the blocks slightly to create more dynamic poses.
You can practice this with inspiration from the pose ideas for drawing collection on DrawingList.
Step 3: Add Limbs with Simple Shapes
For the arms and legs, use cylinders or ovals to flesh out the structure.
- Each arm has three parts: upper arm, forearm, hand.
- Each leg also has three: thigh, calf, foot.
- Keep joints (shoulders, elbows, knees) as simple circles for now.
Why this matters: It’s easier to correct pose and proportion when limbs are represented with basic forms.
Common Mistake: Stiff posture. Try slightly bending limbs to keep the figure feeling alive.
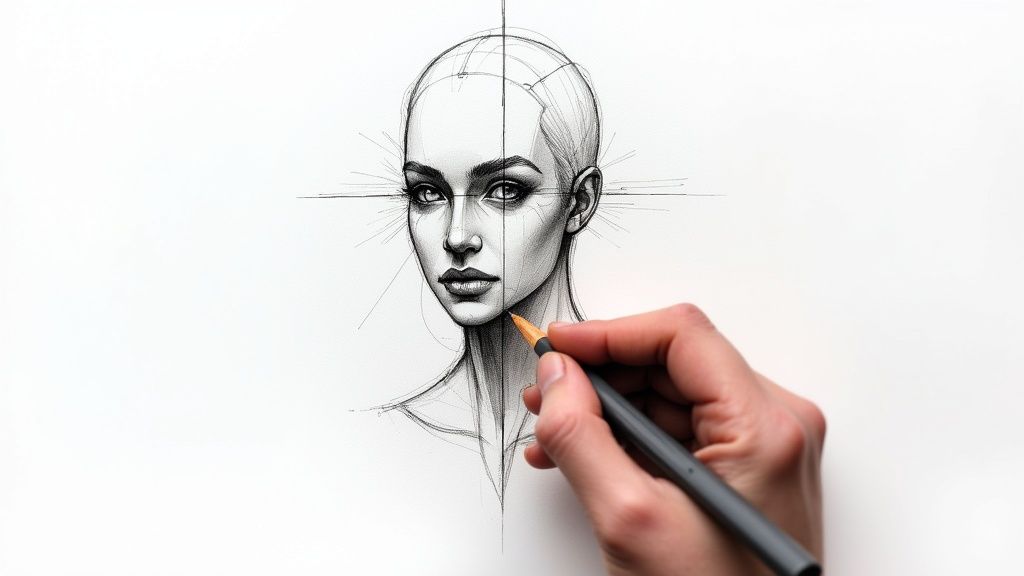
Step 4: Build the Head and Facial Guidelines
Now, return to the head and give it some structure.
- Start with an oval or circle.
- Add a center vertical line (symmetry).
- Draw horizontal lines across the head to guide placement of the eyes, nose, and mouth.
Why this matters: Correct facial alignment avoids awkward or “off” looking portraits.
Variation: Experiment with head tilts and angles.
Step 5: Add Hands and Feet (Simplified)
Hands and feet are tricky, but you can start with simple shapes:
- For hands: Draw a square palm and add rectangles or ovals for fingers.
- For feet: Begin with a wedge shape pointing in the direction of the toes.
Variation: Try different hand gestures or seated leg positions.
Common Mistake: Overcomplicating too soon. Stick to blocks and shapes first.
Step 6: Refine the Silhouette
Use curved lines to connect your basic shapes and build the outer form.
- Smooth out the edges of the limbs and torso.
- Adjust the posture if needed.
- Begin light clothing outlines or body features.
Why this matters: This transition from structure to form helps your drawing feel cohesive and complete.
Step 7: Sketch Clothing and Details
Now add personality through clothing, hair, and light accessories.
- Clothing should follow the shape of the body underneath.
- Avoid over-detailing; keep lines confident and clear.
- Use simple folds to suggest fabric movement.
You might enjoy the inspiration from our drawing ideas for beginners resource when thinking about outfit ideas.
Step 8: Add Basic Shading
Introduce depth with a few key shading techniques:
- Use light hatching to indicate shadows.
- Darken areas where limbs overlap or where clothes create folds.
- Leave highlights where light naturally hits.
Why this matters: Even simple shadows can drastically improve the believability of your drawing.
Variation: Shade under a single light source from different directions.
Step 9: Clean Up and Define
Now, refine your lines:
- Erase unnecessary guides.
- Strengthen confident outlines.
- Emphasize expression or action with subtle contour tweaks.
Common Mistake: Leaving in construction lines too dark, which can distract from the final image.
Skill Builder: Mastering Gesture Drawing
Before mastering portraits or realism, get comfortable with gestures—quick 30–60 second sketches capturing motion and flow.
Try this:
- Use a reference photo of someone dancing or walking.
- Set a timer for 1 minute.
- Capture the movement using flowing lines—not details.
Doing this consistently sharpens your sense of rhythm and proportion.
Mini Drawing Challenge: 5 Person-Themed Prompts
If you're ready to stretch your skills, pick one of these and try sketching it in under 10 minutes:
- A child reaching up for a balloon
- A person sitting cross-legged reading a book
- A dancer mid-leap
- Someone tying their shoes
- A profile portrait of a friend
Each challenge invites creativity and helps train observation and structure.
Wrap-Up
Drawing a person doesn’t need to feel overwhelming. With a structured process and a bit of patience, you’ll be amazed at how quickly your skills improve. Start with simple shapes, focus on flow and proportion, and build from there.
Looking for beginner-friendly subjects? Browse our drawing ideas for kids for playful, less complex characters to help you practice!