Before you can bring a portrait to life, you need the right set of tools. It's not about having the most expensive gear, but about understanding what each tool does and how to use it to create depth, accurate proportions, and believable shading. A few carefully chosen pencils, the right paper, an eraser, and some blending tools are all it takes to turn a flat sketch into something that feels real.
Gathering Your Essential Portrait Drawing Tools
Image
The tools you choose really do set the stage for your success. It’s easy to get overwhelmed and think you need every gadget in the art store, but honestly, you can achieve incredible results with just a handful of essentials. The goal isn’t to have the most supplies, but the right ones.
Think of each tool as a partner in the process. Each one has a specific job, and when they work together, they build the form, texture, and value that create a realistic portrait. It’s like a chef needing different knives for different cuts—we need a variety of pencils and erasers to do our job well.
Your Core Pencil Arsenal
The heart of any portrait artist's kit is a curated set of graphite pencils. You really don't need a huge 24-piece collection to get started. In fact, a smaller, more strategic selection is often way more effective.
If you’re just starting out, grab these three:
A Hard Pencil (2H or H): This is your construction tool. Its lines are light and crisp, which makes it perfect for laying down your initial sketch and mapping out proportions without leaving heavy marks you'll struggle to erase later.
A Mid-Range Pencil (HB or 2B): This is your workhorse. It’s what you’ll use for defining features, adding the first layers of shading, and building up those all-important mid-tones. It gives you a great balance between control and darkness.
A Soft Pencil (4B or 6B): When you need to create those rich, deep shadows, this is the pencil you'll reach for. The soft graphite lays down dark values with very little pressure, which is exactly what you need for the contrast that makes a portrait pop. A touch of 6B in the pupils or deep creases can be a total game-changer.
The Right Surface and Blending Tools
The paper you draw on has a huge impact on how your pencil strokes look and how well you can blend your shading. For realistic portraits, you'll want paper with a bit of "tooth"—a subtle texture that the graphite can grab onto. Smooth Bristol board is fantastic for super fine details, but a vellum surface drawing paper is a great all-rounder for both line work and shading.
And please, don't forget your blending tools. They are non-negotiable if you want to achieve those soft, skin-like gradients.
A classic beginner mistake is using your fingers to blend. The oils from your skin create greasy smudges that are a nightmare to erase or draw over. Pros rely on blending stumps and tortillons to get those seamless transitions.
These simple rolled-paper tools give you incredible control, letting you gently push the graphite into the paper's tooth for a smooth, almost airbrushed effect.
In the same vein, a kneaded eraser is more of a drawing tool than just a way to fix mistakes. You can shape it to a fine point to lift out tiny highlights in the eyes or on the tip of the nose, adding that final spark of life that makes a portrait feel real.
Even with digital art's popularity, these traditional techniques are as relevant as ever. In fact, research shows over 65% of art students in major academies focus on portrait drawing, and traditional media like graphite are favored by over 75% of artists for the control they offer. You can explore more about the rich history of this art form over at Britannica.com.
Getting your toolkit right from the start makes a huge difference. Here's a quick look at the essentials I recommend for anyone serious about drawing lifelike portraits.
Essential Portrait Drawing Toolkit
Tool | Recommended Type/Grade | Primary Use in Portraiture |
|---|---|---|
Graphite Pencils | 2H, HB, 2B, 6B | Creating a full value range from light sketches to deep shadows. |
Drawing Paper | Bristol Board (Vellum) | Provides a textured surface ideal for layering and blending graphite. |
Kneaded Eraser | Soft, pliable eraser | Lifting graphite to create subtle highlights and correct errors gently. |
Blending Stumps | Tightly rolled paper | Smoothing and blending shaded areas for realistic skin texture. |
By starting with this focused set of quality tools, you build a solid foundation. You'll learn their individual strengths and, more importantly, how they work together to help you master realistic portrait drawing.
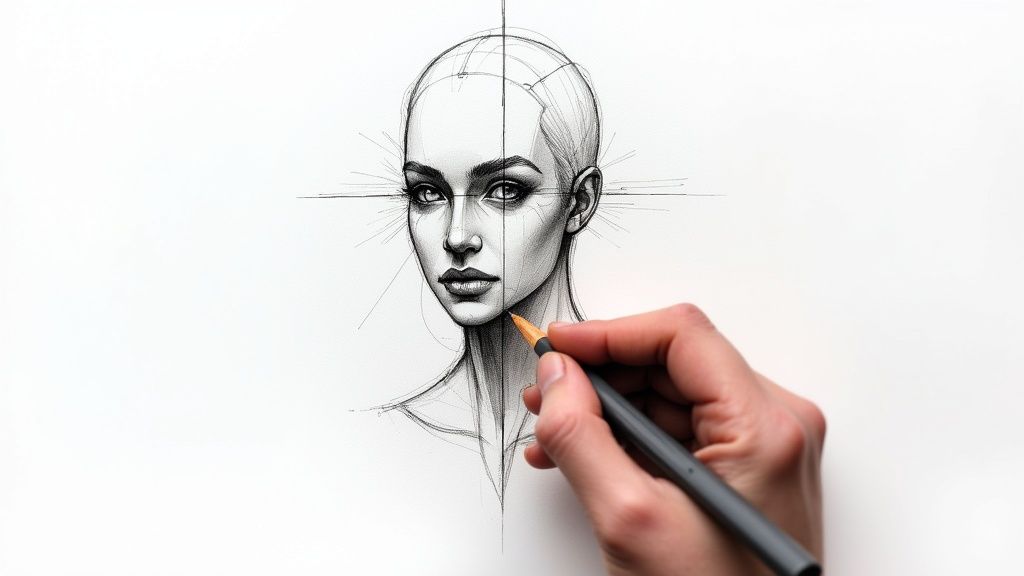
Mastering Proportions with the Loomis Method
Let's be honest, one of the biggest roadblocks in drawing a realistic portrait is getting the proportions right. It's so easy to end up with eyes that are too high or a chin that’s way too long. If you've ever felt that frustration, the Loomis Method is about to become your best friend. Developed by the legendary illustrator Andrew Loomis, it’s a time-tested framework that takes the guesswork out of placing features, giving you a solid foundation to build on.
The real magic of this method is that it forces you to stop thinking in two dimensions. Instead, you start seeing the head for what it is: a three-dimensional object. It all begins with a simple sphere.
Starting with the Cranial Mass
First things first, draw a circle. It doesn’t have to be perfect—a quick, freehand circle will do just fine. Now, imagine that circle is a ball. Picture slicing a flat, oval piece off each side. Suddenly, your simple circle starts to look like the main mass of the human skull, which isn’t a perfect sphere. Those flattened sides represent the temporal area, immediately giving your drawing a sense of form and dimension.
This initial step is so important because it establishes the skull's volume before you even think about where the eyes or nose go. It’s the key to avoiding that flat, "pancake" look that plagues so many beginner portraits.
The core idea of the Loomis Method is to think like a sculptor. You're not just drawing lines; you're building a form in space, starting with the largest and most basic shape—the skull.
Once you’ve defined that cranial mass, it's time to map out the landmarks that will guide the placement of every feature. This is where the method truly starts to shine.
Establishing the Core Facial Lines
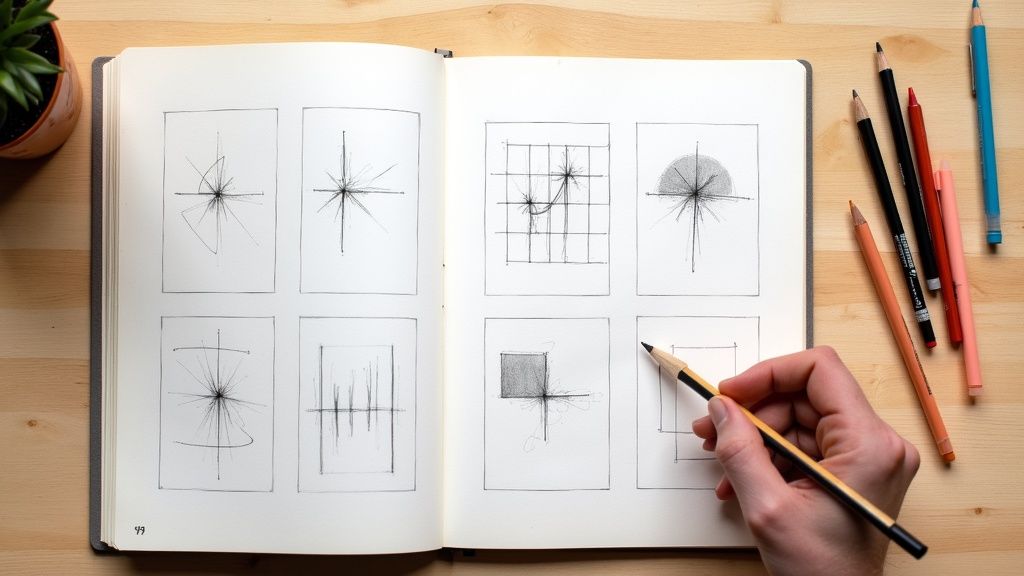
Now, draw a line that wraps around the center of your sphere, both horizontally and vertically. That horizontal line is your brow line, and it’s the most important anchor in the whole process. This line sets the eye level. The vertical line running down the middle ensures your drawing is symmetrical and helps you align everything perfectly.
The infographic below shows how these initial lines and simple tonal blocks start to build the face's structure, eventually leading to realistic shading on features like the cheek.
Image
It’s a great visual reminder that even the most complex forms are just a series of simple, connected shapes and values built on a solid foundation.
A classic mistake is putting the eyes too high up. Here’s a rule to live by: *the eyes sit halfway down the entire head***, not halfway down the face. The brow line you just drew is that halfway point.
From here, you can divide the face into three roughly equal sections:
From the hairline to the brow line.
From the brow line to the bottom of the nose.
From the bottom of the nose to the bottom of the chin.
To map this out, just measure the distance from the top of the sphere down to your brow line. Use that same measurement to mark the bottom of the nose, and then again to find the bottom of the chin. Boom—a perfectly balanced grid for your portrait.
Placing the Eyes, Nose, and Mouth
With your grid locked in, placing the features becomes way less intimidating. The eyes will rest right on that brow line you established. A great rule of thumb is that the head is about five "eyes" wide, which means the space between the two eyes is roughly the width of one eye.
The bottom of the nose will land on the second horizontal line you marked. As a general guide, the edges of the nostrils usually line up with the inner corners of the eyes. To place the mouth, find the halfway point between the bottom of your nose and the chin—that’s where the opening of the lips will sit.
While these steps focus on the head, having a grasp of the entire figure can really elevate your work. If you're looking to expand your skills beyond portraits, our guide on how to draw a person is a great next step for understanding full-body anatomy.
This structured approach turns a daunting task into a manageable process. It’s a powerful tool that allows you to construct a believable head from any angle, ensuring your proportions are solid before you get lost in the finer details.
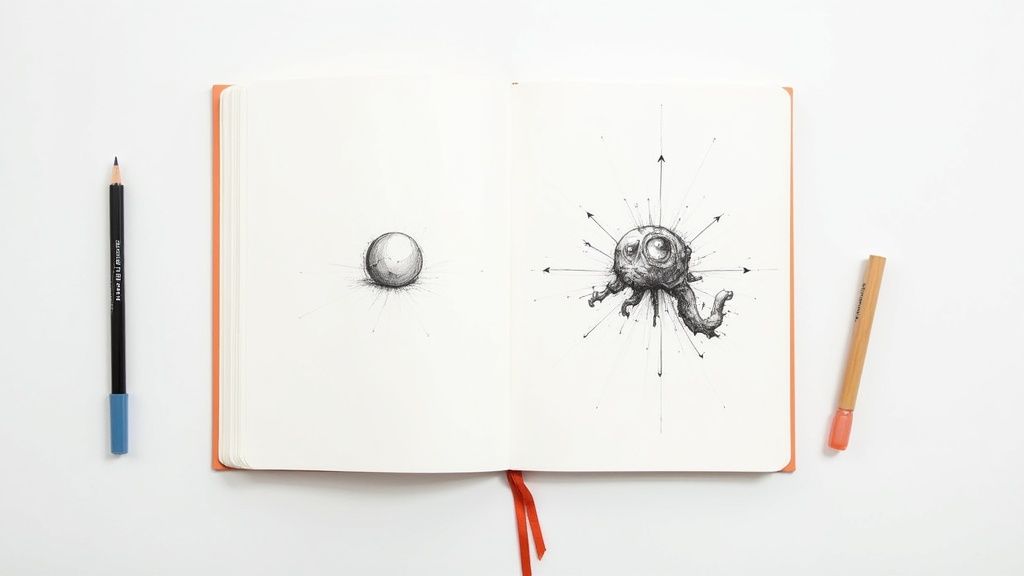
Drawing Features with Form and Dimension
Image
Alright, you've got your proportional map laid out. Now for the fun part. This is where we stop constructing and start creating—where the real artistry begins. We're moving beyond simple lines to actually sculpt the individual features. Think of each one as a three-dimensional form, complete with its own unique planes, curves, and shadows.
So many beginners get stuck drawing symbols: an almond for an eye, a triangle for a nose. To get that lifelike quality, you have to break that habit. You need to start seeing these features for what they are—complex structures that catch light and cast shadows, just like any other object. That mental shift is everything if you want to make a portrait feel real and alive.
Sculpting Eyes with Volume
They say the eyes are the windows to the soul, and it's true. They're almost always the focal point of a portrait. To draw them well, stop thinking of them as flat shapes. Instead, picture the eyeball as a sphere resting inside the eye socket. The eyelids aren't just lines; they're thin layers of skin wrapping around that sphere.
This is a game-changer. Since the eyeball is round, the eyelids will naturally curve away from you at the corners. It also means the highlights and shadows on the eyeball itself will follow a spherical form.
To really bring the eyes to life, zero in on these details:
The Eyelids: Don't forget their thickness! Eyelids have a real edge, especially the lower one where you might see the waterline. It's a subtle detail, but it adds a massive dose of realism.
The Iris and Pupil: The iris isn't just a flat-colored circle. It’s slightly concave, so the shading will never be uniform. The pupil is a deep, dark void, but it should still catch a tiny, sharp specular highlight—that's the direct reflection of your light source.
The Cornea: That clear layer over the iris and pupil bulges outward slightly. This is what creates that bright, crisp highlight. Nailing its placement is the secret to making an eye look wet and reflective.
A pro tip I learned the hard way: the white of the eye (the sclera) is never pure white. It’s a sphere, so it's going to have subtle shading, especially in the corners where the eyelids cast a soft shadow. Ditching the stark white immediately makes the eye feel more natural and integrated.
Building the Nose from Planes
The nose can be a real beast to draw because it projects right off the face. If you just draw its outline, it will always look flat. The secret I've found is to see it as a collection of simple geometric planes before you add any curves.
Imagine the nose as a blocky structure with three main parts.
The Bridge: This is the long, flat plane running down the top. It's going to catch the most light.
The Tip (or Ball): This is the rounded form at the end, and it usually has its own distinct highlight.
The Nostrils and Wings: These are the curved sides that connect to the face. They almost always fall into shadow.
By lightly sketching these planes and shading them based on your light source, you automatically create dimension. The magic happens when you softly blend the transitions between these planes to create the gentle curves of a real nose. This block-in method makes the whole process less intimidating and gives you a clear roadmap to a 3D result.
Shaping Lips with Form
Just like the nose, lips have to be built from planes, not drawn with a simple outline. A harsh line around the mouth is one of the most common mistakes, and it instantly flattens the portrait. You have to think of lips as soft, fleshy forms that have real volume.
Here's a helpful way to visualize them—break the lips down into five distinct "pillows" or planes:
The upper lip is made of three forms: a central plane and two smaller ones on either side that curve backward.
The lower lip is a bit simpler, usually just two larger, rounded forms.
The upper lip is typically angled down, so it catches less light and appears darker. The lower lip angles out, catches more light, and often has a nice, prominent highlight. The darkest part? Almost always the line where the lips meet.
This quest for realism isn't new, of course. Artists have been trying to capture lifelike faces for millennia. We can trace this practice back at least 5,000 years to ancient Egypt. But it was during the Renaissance that artists really started nailing it with anatomical studies and the use of light and shadow, or chiaroscuro. Da Vinci’s Mona Lisa is a perfect example of this leap forward, with her softly blended features that feel so much more alive than the rigid styles that came before. You can dive deeper into this fascinating history by exploring the evolution of portrait painting on ArtistChristinaCarmel.com.
When you treat each facial feature like a unique sculpture, you're building a portrait that has genuine weight and dimension. This thoughtful, form-based approach is what separates a simple sketch from a piece of art that truly feels alive.
Shading and Rendering Believable Skin Texture
This is where the magic happens. Shading is what transforms a flat line drawing into a living, breathing portrait with weight, volume, and genuine presence. If you want to draw realistic portraits, you have to learn to see and render light and shadow with both subtlety and patience.
It all starts with one simple question: where is the light coming from? Before your pencil even hits the paper, you need to decide. Is it soft, diffused light from a cloudy day? Or is it a sharp, dramatic light from a single lamp? That one decision will dictate every mark you make from here on out.
Identifying Key Light and Shadow Zones
Every object, including the human face, is really just a collection of values. When you learn to see these zones, you can build up the form logically instead of just trying to copy what you see. Don't think about shading an entire cheek at once. Instead, think of it as mapping out these specific areas of light and shadow first.
Highlight: This is the brightest spot where light hits the face directly. On skin, it’s usually a soft glow, not a sharp, glassy reflection.
Light: The area right around the highlight. It's still directly lit, but it’s starting to curve away from the light source.
Mid-tone: This is the crucial transition between the light and shadow areas. It’s where you’ll see most of the face's true local color.
Core Shadow: The darkest part of the shadow on the face itself. This happens where the form turns completely away from the light.
Reflected Light: A faint, tricky light that bounces off nearby surfaces (like a shirt collar or a wall) and into the shadow side of the face. A classic beginner mistake is making this area way too bright.
Building your drawing with these zones in mind is the best way to keep your shading from looking flat or muddy. You’re essentially sculpting the face with your pencil, creating the illusion of bone and muscle through value alone.
The real secret to realistic shading is patience. It's so tempting to press hard and go dark right away, but you’ll get a much more convincing, luminous skin texture by building up your values in light, transparent layers.
This careful control of value has been a cornerstone of realism for centuries. While many 20th-century artists moved toward abstraction, realist painters like Andrew Wyeth continued to show the incredible power of tonal quality. His famous 'Helga' series, a collection of 247 portraits of a single person, is a masterclass in using nuanced shading to convey mood and life that goes far beyond a simple photograph. You can read more about the long history of portrait painting at Wikipedia.com.
Practical Shading Techniques for Skin
Once you understand the 'what' of value, you need to know the 'how.' Different shading techniques create very different textures. For the soft, porous quality of skin, some methods just work better than others.
The main goal is to avoid harsh, directional lines that will shatter the illusion of smooth skin. One of the absolute best ways to do this is with circulism. Grab a sharp pencil (an HB or 2B works well) and apply the graphite in tiny, overlapping circular motions. This technique lays down a beautifully even, gentle layer of tone without leaving any obvious pencil strokes behind.
For your darker areas, you can simply layer these circular motions, gradually building up depth. If you're working with something a bit more dramatic, our guide on charcoal drawing for beginners has some fantastic tips for getting smooth tones with a messier medium.
After you've laid down your initial layers, a blending stump or tortillon will be your best friend. Use it to gently smooth the graphite, pushing it into the grain of the paper. This is what softens the transitions between values and creates that seamless gradient so characteristic of human skin.
Comparing Shading Techniques for Skin Texture
Choosing the right shading method can make or break your skin texture. While techniques like hatching have their place, they often work against the smooth, subtle finish you're looking for in a realistic portrait. Here’s a quick breakdown of the most common approaches.
Technique | Description | Best For | Common Mistake |
|---|---|---|---|
Circulism | Applying graphite in small, overlapping circles. | Creating a smooth, even base tone for skin and building up soft gradients. | Making the circles too large or pressing too hard, which leaves visible scribbles. |
Hatching | Drawing parallel lines to create value. | Quickly blocking in shadow areas or rendering hair. Not ideal for smooth skin. | Leaving obvious gaps between lines or using lines that are too thick and harsh. |
Cross-Hatching | Layering sets of parallel lines in different directions. | Building deep, rich shadows and creating texture on rougher surfaces like fabric. | Overworking the area until it becomes a messy, dark patch with no clear form. |
As you can see, circulism is often the superior choice for skin, but knowing the others helps you understand what to avoid and when a different texture might be needed.
Adding Texture and Imperfections
Let's be honest—perfectly smooth skin is a myth. Realism comes from rendering the subtle textures and so-called "imperfections" that make each face unique. We're talking about pores, fine lines, freckles, and even the occasional blemish.
To create the look of skin pores, don't even think about drawing each one individually. Instead, use the tooth of your paper to your advantage. After you've blended a smooth mid-tone, you can gently tap the surface with a sharpened hard pencil (like a 2H) to create tiny, subtle indentations that read as pores.
A kneaded eraser is an essential tool for lifting out highlights and creating brighter texture. You can shape it into a super fine point to dab away small bits of graphite, perfectly mimicking the way light catches on the subtle bumps of the skin. This is the key to adding that slight sheen on the forehead, the bridge of the nose, or the top of the cheekbones.
Remember, texture is all about subtlety and suggestion. You're not drawing every single detail; you're creating the illusion of it.
Capturing a Likeness and Adding Personality
You can have a drawing that’s technically perfect—spot-on proportions, flawless shading—but it can still feel… empty. Lifeless. This is the stage where we move beyond the mechanics and start to breathe real life into the work. It’s where a technical exercise becomes a genuine piece of art.
This magic happens when you shift from just looking at the face to truly seeing the person. It's about noticing the tiny, unique details that make someone instantly recognizable, transforming a generic face into a specific individual.
Moving Beyond the Blueprint
Once you've got that foundational structure down, it's time to hunt for the subtle asymmetries and quirks that define a person. Let’s be real: no face is perfectly symmetrical. One eye might sit a fraction higher, a smile might pull more to one side, or one eyebrow might have a slightly sharper arch. These aren't mistakes to be corrected; they're the very details that make up a likeness.
Instead of trying to "fix" these imperfections, lean into them. Actively look for them in your reference photo. This is precisely what separates a stiff, academic drawing from a portrait that feels alive and full of personality.
The goal is no longer just accuracy but authenticity. You’re aiming to capture the subtle things that friends and family would recognize in a heartbeat—the specific way their brow furrows in thought or the unique curve of their smile.
To make sure all these features stay in the right place relative to each other, a lot of artists I know rely on a mental trick called triangulation. It’s a simple but incredibly effective way to constantly cross-check your work.
Here’s how it works. You can mentally draw a triangle between any three points on the face. For instance:
The outer corner of the left eye
The tip of the nose
The corner of the mouth
By constantly comparing the angles and the lengths of the sides of these imaginary triangles in your drawing to the ones in your reference, you keep everything locked in. It’s a great way to prevent features from slowly drifting out of place as you get lost in the details.
Infusing Your Drawing with Personality
Capturing personality is less about a single technique and more about a state of mind—focused observation. You have to start asking questions as you draw. What’s their dominant expression, even if it's subtle? Is there tension in their jaw? Are their eyes soft and relaxed or sharp and focused? The answers will guide your hand, influencing everything from how hard you press your pencil to how you blend your shadows.
Think about the edges in your drawing. Are they all sharp and crisp? In real life, some forms have soft, lost edges that melt into the shadows, while others are hard and defined. A soft edge around the jawline can suggest softer skin, while a hard edge might define a sharp bone structure. Making deliberate choices about your edges adds a huge layer of sophistication and realism.
If you want some great practice capturing that personal spark, try drawing a **portrait of a loved one**. It forces you to look for the nuances you already know are there.
Ultimately, the best portraits are a marriage of technical skill and empathetic observation. You’ve learned the rules of proportion and the science of light and shadow. Now, you get to use that knowledge to interpret what you see and communicate the unique spirit of the person you're drawing. This is the moment your drawing stops being a copy and truly becomes a portrait.
Your Top Portrait Drawing Questions, Answered
Even with the best tutorials, you're bound to hit a few snags. That's a totally normal part of the process. Let's walk through some of the most common questions that come up when you're just starting out, so you can get past the roadblocks and back to drawing.
So, How Long Does This Actually Take?
Everyone wants to know the magic number, but the truth is, it's different for every artist. Your progress is tied directly to how much focused time you put in.
That said, if you're practicing deliberately for about 3-5 hours a week, you'll be amazed at the progress you can make in just a few months. Within a year of steady effort, getting a good likeness and really understanding how to handle light and shadow is an achievable goal. The key isn't speed; it's consistency.
An hour spent really studying the planes of the face is worth more than five hours of just doodling without a purpose.
The journey to realism is a marathon, not a sprint. Celebrate the small wins, like when you finally nail the proportions of a nose or blend a shadow that looks truly soft. Those are the moments that build a masterpiece.
What are the Common Beginner Mistakes I Should Avoid?
I see the same handful of mistakes from new artists all the time. Knowing what they are ahead of time is half the battle.
Watch out for these classic pitfalls:
Placing the eyes too high. It’s a gut instinct for beginners, but the eyes actually sit right on the halfway line of the head. It feels wrong until it clicks.
Relying on hard, dark outlines. Real faces don't have outlines. They're made of soft transitions between light and shadow. Think in terms of value, not lines.
Being afraid of the darks. So many beginners create flat, washed-out drawings because they don't push their shadows dark enough. Don't be timid—contrast is what creates depth and drama.
Jumping to the details too soon. You can't draw perfect eyelashes on an eye that doesn't feel like a sphere. Always work from the big, general shapes down to the tiny details.
Should I Draw from Photos or from a Live Model?
Ah, the classic debate. My answer? Both. They each teach you something incredibly valuable.
Starting out with high-quality photos is a fantastic way to learn. It takes the pressure off. The lighting is consistent, your model never moves, and you can take your time to really see the shapes and shadows. It's a controlled environment perfect for building foundational skills.
But drawing from a live person is the real masterclass. It forces you to understand three-dimensional form in a way a photo never can. You learn to interpret how light wraps around a real head, not just copy what a camera captured.
A great strategy is to use photos to build your confidence and nail down the basic structure. Then, test your skills by drawing friends or family from life. That’s where you’ll see your work really level up.
Feeling inspired to tackle your next project? The Drawing List Drawing Ideas Generator is the perfect tool to overcome artist's block and discover your next masterpiece. Get instant access to thousands of unique prompts to keep your sketchbook full and your skills sharp. Find your next great idea today at https://www.drawinglist.com.