Staring at a blank page can feel pretty daunting, but the real secret to drawing a person isn't some innate talent—it's all about having a solid structure. The most dependable way I've found to get started is by mapping out proportions, using the head's height as a simple ruler for the rest of the body.
Start with Proportions, Not Perfection
Forget about intricate anatomy for a moment. So many beginners get bogged down trying to nail perfect muscles or facial features right out of the gate, and honestly, that’s just a fast track to frustration. A much better way to go is to build a simple stick-figure "skeleton" that gets the proportions right first.
Think of it like building a house. You wouldn't start painting the walls before the frame is properly built, right? This first step is your scaffolding; it ensures your figure looks balanced and believable from the very first line you draw.
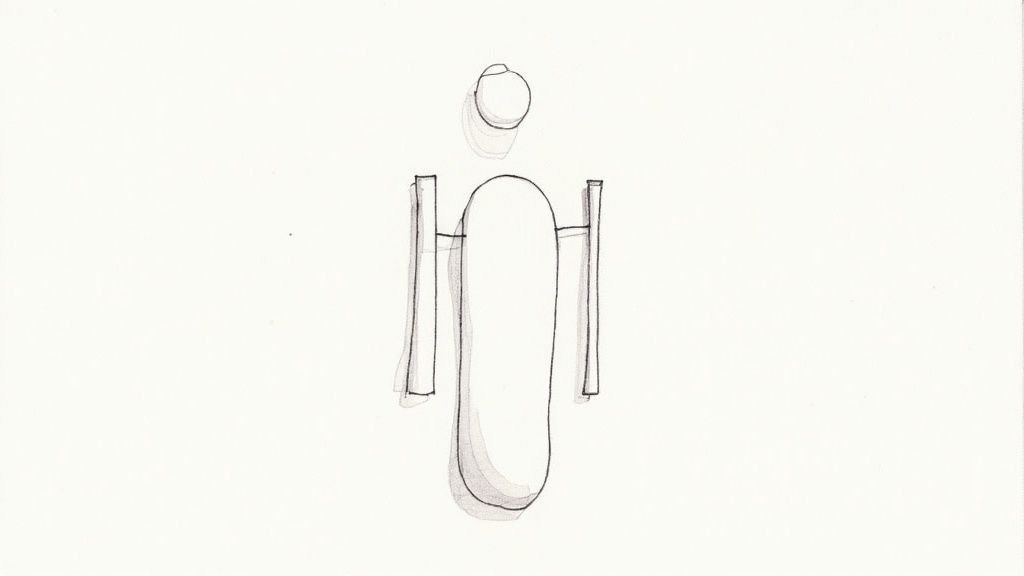
This classic technique, often called the 'head unit' method, is a tried-and-true way to map out a figure. A typical adult stands about 7.5 to 8 heads tall. By using the head you've drawn as your basic unit of measurement, you can quickly block out the entire body with confidence.
The Head Unit Method in Practice
The idea here is wonderfully simple. Once you have your first head shape, you just stack that measurement down the page.
- The torso is roughly two to three heads long, measured from the bottom of the chin to the hips.
- The legs should be about four heads long, with the knees falling about halfway down.
- The arms, when hanging naturally at the side, will have fingertips that reach around the mid-thigh.
This visual guide breaks down how you can use the head as a basic building block for the rest of the figure.
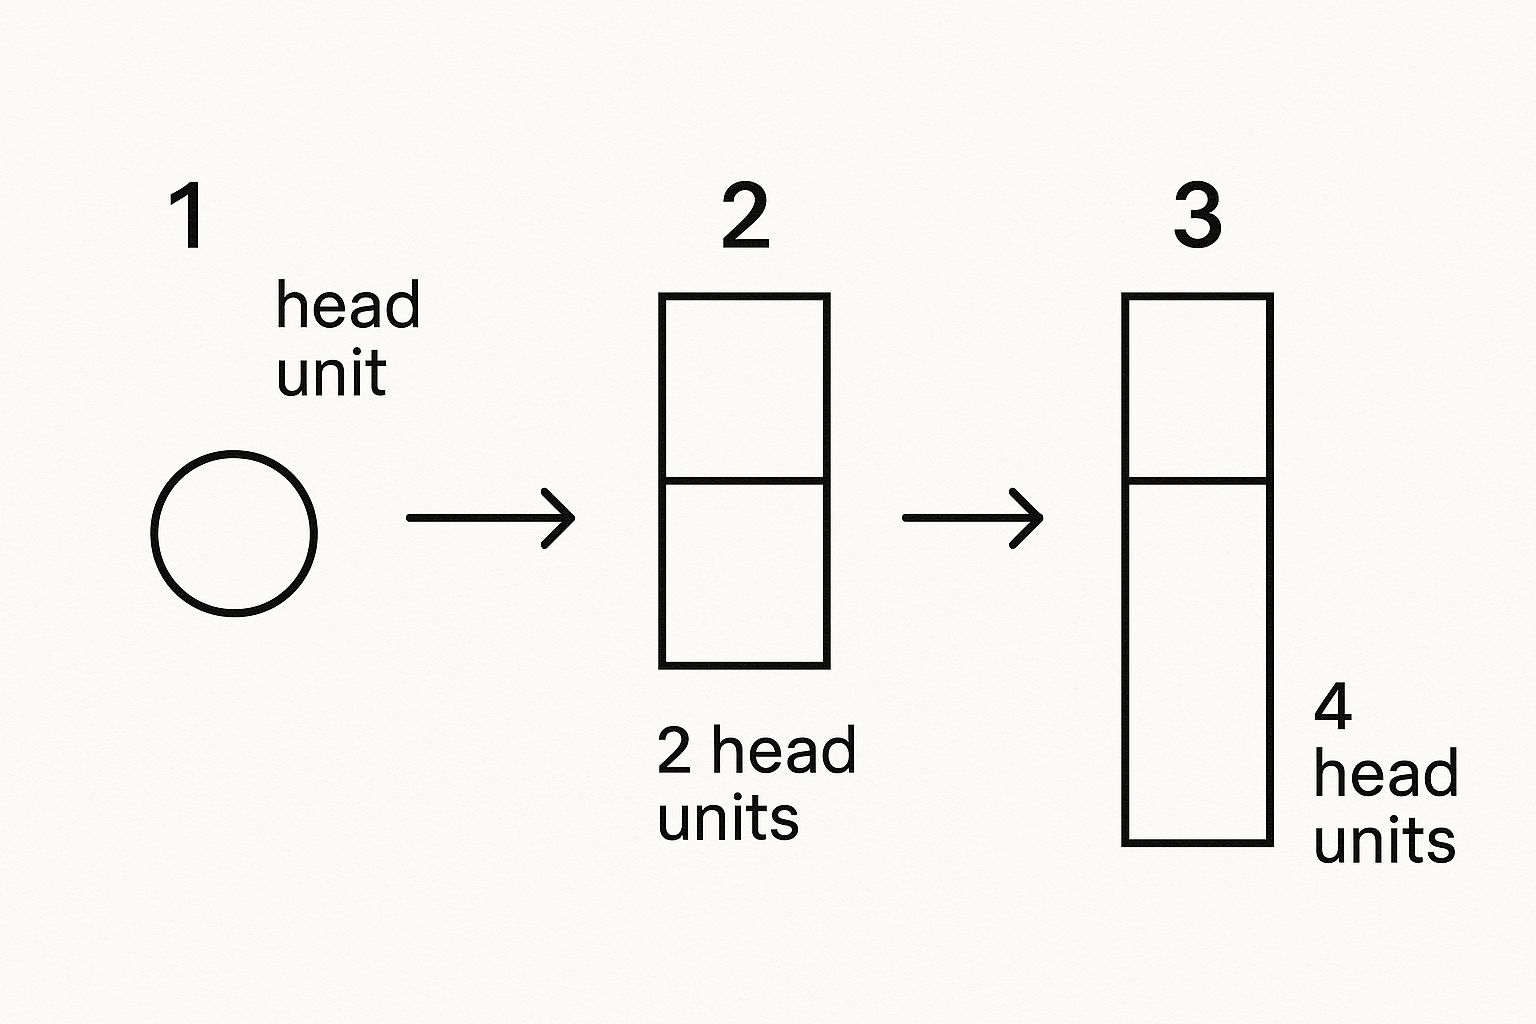
As you can see, breaking the body into these simple, countable sections makes the whole process feel much less intimidating. It's a game-changer.
To make it even easier, here's a quick reference table I use to double-check my work.
Quick Guide to Human Proportions
Use this reference to check the proportions of an average adult figure, measured in 'heads'.
Body Landmark | Approximate Measurement |
|---|---|
Top of head to chin | 1 head |
Shoulders (width) | ~2 heads wide |
Chin to navel | 2 heads |
Navel to crotch | 1 head |
Crotch to knees | 2 heads |
Knees to feet | 2 heads |
Shoulder to fingertips | ~3.5 heads |
This gives you a solid set of checkpoints to make sure your figure is on the right track before you start adding any details.
Remember, this method isn't about creating a perfect final piece right away. It's about building a reliable framework that will support all the details you’ll add later. Once this proportional skeleton starts to feel natural, you'll be ready for more inspiration. You can find some great starting points with these easy drawing ideas for beginners. Mastering this foundational skill is truly the first major step toward drawing people with confidence.
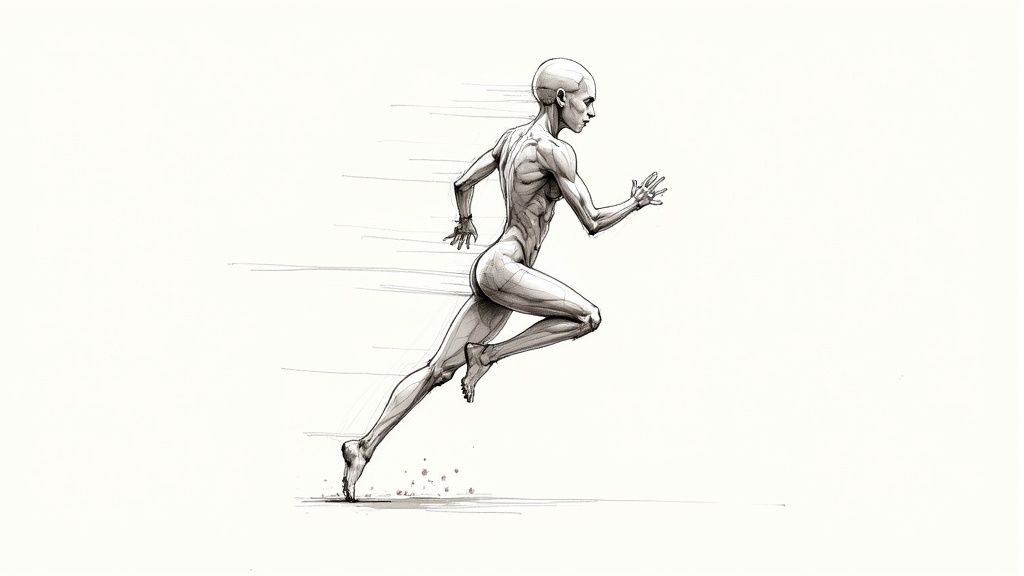
Capturing Movement with Gesture Drawing
You can nail all the proportions and still end up with a figure that feels stiff, almost robotic. If your drawings feel like they’re lacking that spark of life, the problem might not be your anatomy skills. This is where gesture drawing completely changes the game. It’s a technique that prioritizes dynamic energy over static accuracy, and it's the key to making your figures feel like they could walk right off the page.
At the heart of gesture drawing is a simple but powerful concept: the line of action. This is a single, flowing line that captures the entire rhythm and momentum of a pose. Think of it as the figure's energetic spine. It traces the main force of the movement, whether that's a dancer mid-leap or just someone slumping exhausted in a chair.
This approach can feel a bit backward at first. For centuries, learning how to draw a person meant slow, painstaking anatomical study. From the Renaissance through the late 19th century, European art academies drilled students on perfect proportions. But this rigid, academic style was largely abandoned by the 1930s as artists sought more expressive and dynamic methods. You can discover more about the evolution of figure drawing methods to see just how much things have changed.
Finding the Flow of the Pose
So, how do you find this line of action? Look at your subject, whether it's a live model or a photo, and squint a little. Try to ignore the details and see the overall shape of the movement. Is the body creating a simple C-curve? Or is there a more complex S-curve as their weight shifts from one foot to the other?
Once you see it, draw that single, confident line. This is your foundation. Everything else in your quick sketch will be built around this initial mark.
The point of gesture drawing isn't to create a polished masterpiece. It’s about making a quick visual note. You're training your hand and eye to see the energy first and the details second. Once you accept that these drawings are meant to be rough, the pressure to be perfect just melts away.
This mental shift is huge. It helps you get over the fear of making a "bad" drawing and develops a much more intuitive understanding of human dynamics.
Practical Gesture Drawing Exercises
The only way to get good at this is to do it a lot, and to do it fast. You want to get into a state of flow where you're not overthinking every line.
Here are a couple of exercises to get you started:
- 30-Second Sketches: Grab a timer and start drawing. The goal is to capture the essence of a pose in just 30 seconds. Don't worry about faces, hands, or feet. Just focus on the line of action and the general mass of the figure.
- Moving Subjects: Head to a public place with a sketchbook. A coffee shop, a park, or a bus station is perfect. People are always moving, so you’ll be forced to capture their gestures in just a few seconds before they change position.
Think of these exercises as a workout for your artistic eye. You're building the muscle memory needed to translate real-world, three-dimensional movement into a compelling two-dimensional drawing. It's what turns a static figure into a character brimming with life.
Building Form with Simple Shapes
Okay, you've got your gesture and proportions blocked in. Now, we need to give that flat sketch some weight and volume. This is the part where your drawing starts to feel like a real, three-dimensional form, and it's a huge step forward.
The most effective trick I've learned for drawing a person with convincing depth is to break the body down into simple, manageable shapes. Seriously, don't even think about complex anatomy yet. Just learn to see the body as a collection of basic geometric forms. It’s a powerful way to understand how everything connects and occupies space.
By layering these simple shapes over your initial gesture drawing, you're essentially 'sculpting' the figure on the page. This creates a solid foundation before you even think about adding muscles or clothing.
Imagine the different parts of the body as primitive 3D objects. This approach strips away all the intimidating detail and makes constructing a believable figure so much easier.
Visualizing the Body in 3D
Thinking in three dimensions is a skill, and like any skill, it just takes practice. The goal is to see the main masses of the body as distinct shapes that you can mentally rotate and position in space.
Here’s how I break it down:
- Torso: I visualize the rib cage as a large, slightly squashed egg shape. Then I see the pelvis as a separate, smaller block or sphere below it.
- Limbs: The upper and lower arms and legs become simple cylinders. This instantly helps define their thickness and direction.
- Joints: I think of the shoulders, elbows, hips, and knees as spheres. This makes it so much easier to understand how the limbs pivot and bend naturally.
When you're starting out, it can be tough to figure out what to draw to get this practice in. For some great warm-up ideas, you can check out our guide on what you should draw for beginners.
When you combine these shapes over your gesture line, you create a pose that has both fluid movement and believable mass. This is the skeleton of your drawing, and getting it right is everything.
Of all the parts of the human body, three give artists the most trouble: the face, the hands, and the feet. It's in these details, though, where a simple figure drawing really comes alive. If you're feeling intimidated, you're not alone. When I was starting out, I'd often hide a character's hands in their pockets or draw them from behind just to avoid tackling the face.
The secret isn't about perfectly rendering every single detail right away. It’s about simplification.
We're not aiming for a photorealistic portrait here. The goal is to build convincing structures that look and feel like they belong to your figure. Believability trumps perfection every time.
By breaking these complex areas down into manageable shapes, you take the pressure off. This mindset makes practice feel less like a chore and more like a puzzle you're solving piece by piece. Let's start with the most important focal point: the face.
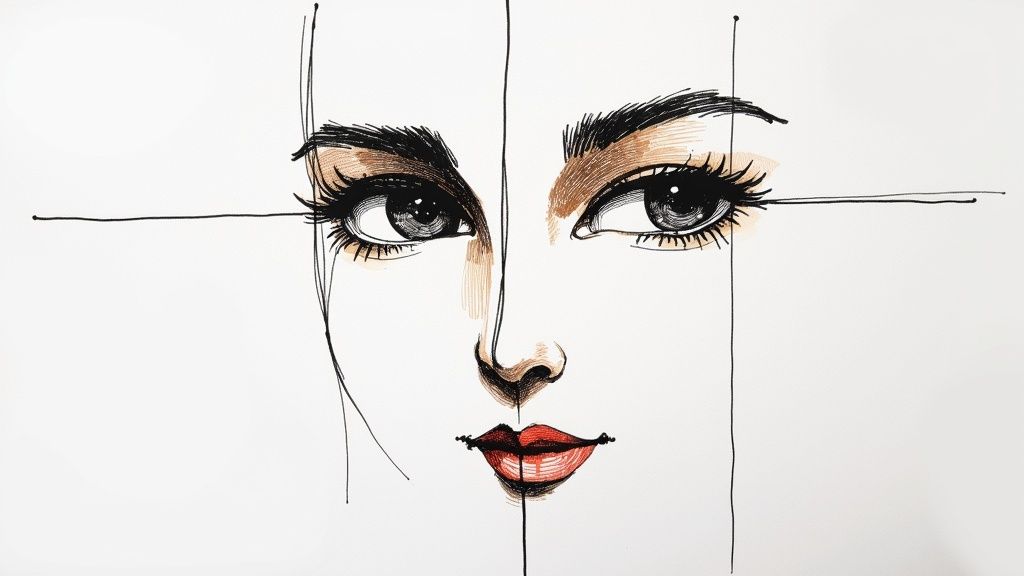
Getting the Facial Proportions Right
One of the most common tells of a beginner's drawing is when facial features seem to float randomly on the head. A few simple guidelines can bring a surprising amount of order and balance to your work.
First, sketch a basic oval for the head. Then, lightly draw a line straight down the middle and another across the horizontal center. These lines are your new best friends.
- The Eye Line: Your horizontal centerline is exactly where the eyes should sit. It feels low, but trust the process! Placing the eyes too high is a classic mistake.
- The Nose: The bottom of the nose generally lands about halfway between that eye line and the bottom of the chin.
- The Mouth: You'll find the mouth's position roughly one-third of the way down from the bottom of the nose to the chin.
Think of these as your go-to starting points. They won't be perfect for every single person, but they provide a solid foundation for the vast majority of faces you'll ever draw.
Tackling Hands and Feet Without the Headache
Ah, hands. The bane of many an artist's existence. The best way I've found to avoid drawing those dreaded "sausage fingers" or flat-looking mittens is to stop thinking of a hand as a hand. Instead, see it as a collection of simple forms.
Start with a flat, slightly squarish or trapezoidal block for the palm. From there, you can attach simple cylinders for the fingers and a separate, more triangular shape for the thumb's base. This approach lets you get the pose and gesture right before you even think about knuckles or fingernails.
Feet are similar. Don't try to draw a foot. Instead, think of it as a basic wedge shape, almost like a slice of cheese tipped on its side. This simple form immediately establishes the structure of the arch and the heel. Once that wedge feels right, you can add smaller, blocky shapes for the toes.
By simplifying first, you nail the foundation. The details can always come later.
Bringing Your Figure to Life with Shading and Clothing
Once you've got the basic structure of your figure down, it's time to pull it out of the flat, 2D world and give it some real weight. This is where light, shadow, and clothing work their magic, turning a simple outline into a character that feels like it has actual form. You don't need to be a master of blending to get started; a few simple techniques can make a world of difference.
First thing's first: where is your light coming from? Is it high above, off to the side, or maybe from behind? Pick one direction and stay consistent. Any part of the body that faces the light will be your highlight, and the surfaces turned away will fall into shadow. Just making this one decision gives your figure immediate volume.
For example, imagine the light is directly overhead. Logically, you’d find shadows under the chin, below the chest, and on the undersides of the arms and legs. This contrast alone creates a powerful illusion of depth.
Shading is really more about observation than pure artistic flair. All you're doing is mapping out which parts of the form are turned away from the light. Even simple hatching—just a series of small, parallel lines—is incredibly effective at creating shadows that make your figure pop right off the page.
Dressing Your Figure Naturally
Clothing isn’t just an accessory; it’s a tool for defining the form beneath it. The trick is to stop trying to draw every single wrinkle you see. Instead, focus on how the fabric actually hangs, stretches, and bunches over the body.
The most important concept to grasp here is tension points. These are the places where fabric gets pulled taut or compressed—think elbows, knees, shoulders, and the curve of the hips. Drawing just a few key folds that radiate from these points will look infinitely more realistic than a mess of random lines.
Pay attention to how different fabrics behave:
- Draping: Fabric hangs loosely from anchor points like the shoulders.
- Stretching: Material pulls tight across broader surfaces, like the chest or a bent knee.
- Bunching: Fabric gathers and compresses in the crook of a joint, like the inside of an elbow.
Even modern tech can be a huge help here. AI image generators, which have already churned out over 12.5 billion images, are fantastic for pulling up instant references for specific poses, lighting setups, or clothing styles. They're a great supplement to traditional life drawing, offering a massive library of visual ideas. You can discover more statistics about AI's role in art and see just how much of an impact it's having.
By keeping these two ideas in mind—a consistent light source and the natural behavior of fabric at tension points—you’ll be well on your way to creating drawings that feel grounded and believable.
Common Questions About Drawing People
As you start learning how to draw a person, you’re bound to hit a few of the same hurdles every artist faces. It's a completely normal part of the process, so don't get discouraged. The best way to improve is to tackle these common issues head-on.
One of the first questions I always hear is, "What tools do I really need?" Honestly, you don't need a fancy, expensive kit. A simple graphite pencil, a decent eraser, and some plain paper are all it takes to get started. The goal is practice and mileage, not collecting the most impressive supplies.
Another classic struggle is creating drawings that look stiff or robotic. If your figures feel lifeless, your secret weapon is gesture drawing. Seriously, this is a game-changer. Set a timer for just 30 or 60 seconds and try to capture the essence of a pose with just a few flowing, energetic lines. It forces you to see the movement first, long before you get bogged down in details.
Finding Practice Subjects
Okay, so where do you find people to draw, especially if you don't have a live model on hand? Luckily, finding great references is easier now than it has ever been.
Your best friend for figure drawing practice is the internet. Websites packed with photo references, like Pinterest, give you a bottomless well of people in every imaginable pose. For a real challenge, try sketching strangers at a local coffee shop or park—it's fantastic for training your eye and speed.
The art world itself has exploded online. The global online art market hit a value of about $14.38 billion in 2022, and it's only expected to keep growing. This digital boom means there are more learning tools and apps than ever before. If you're curious, you can read the full research on the online art market to see just how much technology is changing the game for artists.
And if you're just staring at a blank page and need a creative spark, check out these character drawing prompts. They're perfect for getting the ideas flowing for your next practice session.
Feeling inspired? Drawing List is an AI-powered idea generator with over 1,600 unique prompts to bust through creative blocks. Find endless ideas for your next masterpiece at https://www.drawinglist.com.