So, you want to draw a fantasy map. It’s a craft that blends pure imagination with a dash of real-world geography, starting with a spark of an idea and ending with a fully realized world. The journey begins by deciding what your world is all about, finding a little inspiration, and then getting your hands dirty sketching the first rough shapes of your continents. After that, it’s all about layering in the details—mountains, rivers, cities—and finishing with those classic artistic touches, like a compass rose or some unique hand-lettering.
From Blank Page to Living World
Staring at a blank page is intimidating for anyone. But think of it this way: a map isn't just a drawing; it's the first real, tangible piece of your story. Every line you put down, whether it's a jagged coastline or a tiny path connecting two villages, starts to give your world a history and a personality. This guide is here to walk you through that process, whether you're a writer building a new realm, a Dungeon Master planning your next campaign, or just an artist looking for a new creative challenge.
Image
What's The Point of Your Map?
Before you even think about picking up a pencil, ask yourself one crucial question: What is this map for? Seriously, the answer changes everything.
A map for a novel, for instance, might be all about setting a grand, epic mood. It needs to feel vast and ancient. But a map for a tabletop RPG? That needs to be practical. It should be easy to read, maybe have a hex grid for travel, and feature clear, gameable points of interest that players will actually want to explore. Nailing down the purpose first saves you a ton of rework later.
This early stage is purely about brainstorming. Inspiration is everywhere if you know where to look:
- Real-world Geography: Go to Google Earth and just look around. The fjords of Norway, the fractured coastlines of Greece, the deltas of major rivers—nature has already created the most believable and interesting patterns you could ever hope for.
- Historical Maps: Old maps are a goldmine. They’re full of beautiful mistakes, artistic flourishes, and a certain charm that modern maps lack. They remind you that maps can be art, not just data.
- The Classics: Let's be honest, we owe a lot to J.R.R. Tolkien. His maps for Middle-earth, published with The Lord of the Rings between 1954 and 1955, basically invented the genre as we know it. He made the map an essential part of the fantasy experience. If you're curious, the history of fantasy cartography on Wikipedia.com is a fascinating rabbit hole.
A great fantasy map doesn't just show a place; it tells a story. The placement of a single mountain can explain a kingdom's isolation, while a river's path can dictate the flow of trade and conflict for centuries.
Picking Your Cartography Tools
How you make your map—your tools and your medium—will have a huge impact on your process and the final look. There’s no "right" answer here, just what feels right for you and the story you're trying to tell. You've basically got two paths.
Traditional (Pen & Paper) This is the old-school, hands-on approach. There’s something deeply satisfying about the tactile feel of pen on paper.
- Pros: It gives you a wonderfully organic, hand-crafted aesthetic. You can get amazing results with some fine-tipped pens like Microns, a good pencil for sketching, and some quality textured paper. Plus, the "happy accidents" that happen with ink can sometimes lead to your best ideas.
- Cons: Mistakes are permanent. Spilled ink or a bad line can be a real headache. It's less forgiving.
Digital (Software) Working digitally offers a safety net and incredible flexibility.
- Pros: Programs like Photoshop, Procreate, or dedicated map-making software like Wonderdraft are game-changers. The ability to use layers, undo mistakes with a keystroke, and experiment with endless brushes and textures is freeing.
- Cons: It can sometimes feel a bit sterile if you're not careful. It also requires a bit of a learning curve and the right hardware (like a drawing tablet).
By the end of this guide, my goal is to give you a solid foundation and the confidence to stop thinking and start drawing. Your world is waiting.
Laying Down Continents and Coastlines
Every great world starts as just a single, wandering line on a blank page. This is the moment your map comes to life, but it’s also a common stumbling block. It's so easy to just draw a few big, smooth, blob-like continents. The problem? It immediately makes your world feel fake. The secret is to let go of perfection and think a little more like a geologist.
Real-world coastlines are a beautiful, chaotic mess. They're jagged with fjords, jut out into peninsulas, and are splintered into archipelagos. All of that is the result of thousands of years of tectonic plates crashing together, water eroding rock, and sea levels rising and falling. To make your map feel real, you need to capture a bit of that wonderful chaos. Remember, the shape of your land isn't just for looks—it's the foundation for everything from climate zones to trade routes.
Find Your Shapes in Chaos
So, how do you invent something that feels like it wasn't invented at all? You have to introduce some genuine randomness into the process. Instead of trying to consciously draw a "cool-looking" continent, let chance do the hard work for you.
Here are a couple of my favorite go-to methods:
- The Rice Trick: This one's an old classic for a reason. Grab a small handful of uncooked rice or lentils and gently drop them onto your paper. The scattered cluster you get will have a fantastic, clumpy, and irregular outline. Just lightly trace around that general shape with a pencil, and you have your first coastline.
- The Crumpled Paper Method: Ball up a piece of scrap paper, then gently flatten it back out. That network of creases looks uncannily like a topographical map, with ridges and valleys that make for amazing mountain ranges and coastlines. You can even place it under a fresh sheet of paper and use the lines you see through it as a guide.
A quick pro-tip: These random shapes are just your starting point. The real artistry comes in the refinement. Trace the parts of the outline that look most interesting and then start adding your own details—little bays, sharp inlets, and a smattering of offshore islands. This is what makes a coastline feel weathered and ancient.
Nail Down Your Scale Early
Before you get too attached to those beautiful coastlines you just drew, you have to decide on the scale of your world. Is this a map of a single, isolated island kingdom, or are we looking at a sprawling supercontinent that wraps around the entire globe? Making this call right now is crucial, as it affects every single decision you make from here on out.
A map of a small region can be jam-packed with detail. You can mark every single village, forest path, and crumbling ruin. A world map, on the other hand, forces you to be selective. You'll be drawing entire mountain ranges, not individual peaks. Figuring out your scale from the get-go keeps your map consistent and helps you (and your audience) understand the vast distances involved.
If you're just getting started, it can be a huge help to check out some fantasy map creation ideas and examples to see how other cartographers have tackled scale.
Choosing Your Map Making Tools
Whether you're a traditionalist with pen and paper or you're going fully digital, your tools absolutely make a difference. You don't need a professional-grade setup, but understanding the pros and cons of each medium can save you a lot of headaches.
I've laid out a quick comparison to help you decide which path is right for you.
Choosing Your Map Making Tools
Feature | Traditional (Pen & Paper) | Digital (Software like Photoshop, Procreate) |
|---|---|---|
Feel & Aesthetic | Gives you that authentic, hand-drawn look. There's nothing quite like the feel of pen on paper. | Perfect for clean lines and endless textures. The go-to for a polished, professional finish. |
Flexibility | Mistakes are pretty permanent. You really have to plan your moves and keep a steady hand. | The "undo" button is your best friend. Layers make experimenting with ideas a breeze. |
Recommended Tools | Fine-tipped ink pens (like Microns), a good mechanical pencil, and some quality textured paper. | A drawing tablet and software like Photoshop, Procreate, or a dedicated app like Wonderdraft. |
Ultimately, there's no right or wrong answer here; it's all about personal preference. I know plenty of artists who sketch their maps by hand and then scan them to add color and labels digitally—the best of both worlds! The key is to pick the tools that you enjoy using, because this foundational stage of creating your world sets the tone for the entire journey ahead.
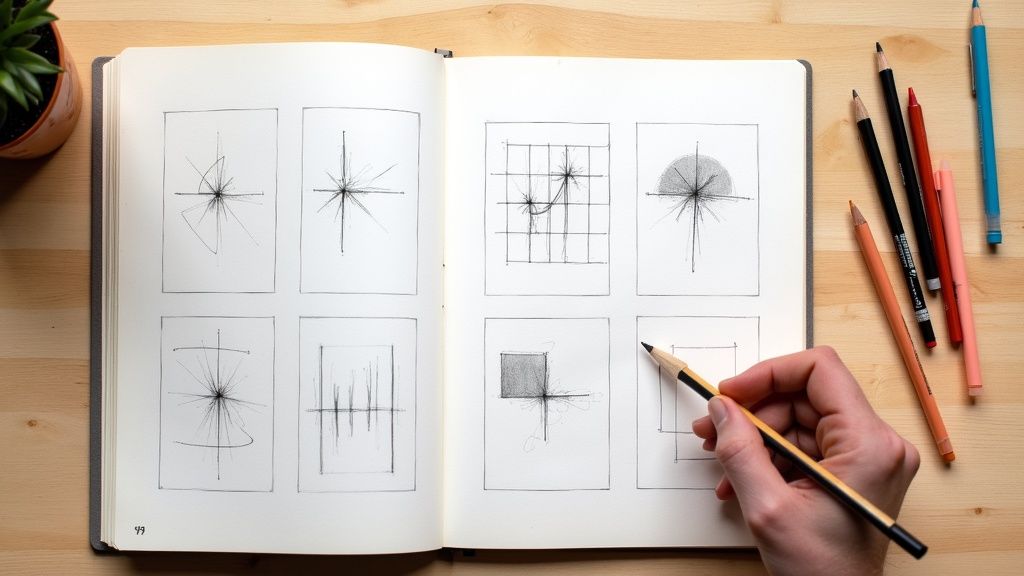
Shaping Terrain with Mountains and Rivers
Alright, you’ve got your coastlines. Your map has a basic shape, but let's be honest—it's pretty flat and boring right now. This next part, adding mountains and rivers, is where you start breathing life and history into the world. You’re not just drawing lines; you’re building the geological and ecological logic that will define everything from weather patterns to where cities will eventually rise.
Building the Bones of Your World
Think of mountains as the skeleton of your continent. To place them in a way that feels real, you have to think about why they’d be there in the first place. Imagine tectonic plates crashing into each other, forcing the land to buckle and rise. A great way I’ve found to start is by drawing one strong, decisive line—the spine of the mountain range. From that main line, you can then sketch out smaller ridges and spurs that branch off, giving it that natural, fractured look.
Don't fall into the trap of drawing every peak the same way. The style of your mountains actually tells a story about how old they are.
- Young Mountains: Picture the Rockies or the Himalayas. They’re sharp, jagged, and dramatic. Use aggressive, pointy shapes to show they haven't been ground down by millions of years of erosion.
- Old Mountains: The Appalachians are the classic example here. These are ancient, weathered, and rounded. You’ll want to draw these with softer, more rolling lines to show their immense age.
This infographic lays out a simple workflow for getting these crucial features onto your map.
Image
Following a process like this helps ensure everything is placed logically, with rivers flowing naturally from the high ground you’ve just created.
The Unbreakable Rules of River Logic
Once your mountains are sketched in, it's river time. This is where so many new mapmakers trip up and create something that just feels wrong, even if the viewer can't put their finger on why. Rivers follow a few hard-and-fast rules, all thanks to gravity.
First and foremost, rivers never split on their way downstream. They only merge. Smaller streams and tributaries flow into bigger ones, which then join to form massive rivers that empty into the sea. I like to think of it as a tree in reverse: countless tiny twigs at the high elevations all converge into a single, thick trunk at the coast.
Second, water always flows downhill. Your rivers need to start in high places, like mountains or hills, and then find the path of least resistance to the lowest possible point—usually a lake or the ocean. A river should never connect two oceans. That's a strait or a channel, which is a totally different beast.
A common mistake I see all the time is drawing rivers that cut a continent perfectly in half. Real rivers meander. They wind through valleys and often spread out into wide deltas as they approach the coast. Adding some gentle curves, especially across flat plains, will make your map feel much more authentic.
Connecting Mountains and Climate
Those mountains you just drew aren't just for show; they have a massive impact on your world's climate. When moist air blows in from the ocean, it gets pushed upward by the mountains. As it rises, it cools and dumps its moisture as rain. This creates lush, green lands on the windward side of the range.
But what happens after it crosses the peaks? That air is now dry. As it sinks on the other side, it creates an arid region known as a rain shadow. This simple concept is why the real world has dense forests on one side of a mountain range and barren deserts on the other. Once you decide which direction your prevailing winds come from, you can logically place your forests, plains, and wastelands, adding yet another layer of believable detail to your world.
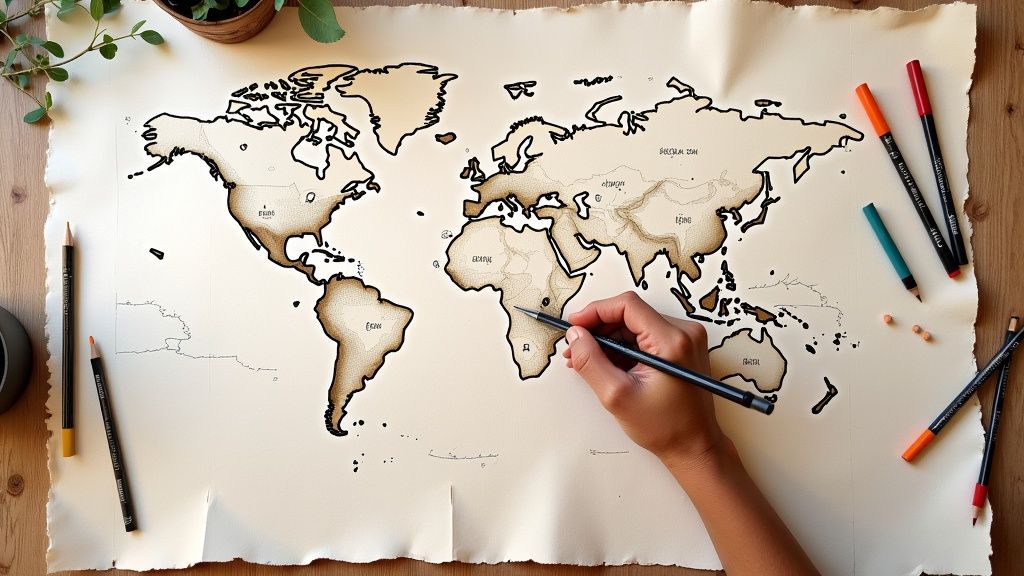
Breathing Life Into Your World: Forests, Cities, and Roads
So, you’ve got your continents, mountains, and rivers sketched out. Your world has a skeleton, a physical form. Fantastic. Now for the fun part: adding the signs of life that turn a geographical drawing into a living, breathing world. This is where we’ll add the sprawling forests, the bustling cities, and the well-trodden roads that connect everything.
Image
We'll start by populating the landscape with nature itself. The placement of forests, deserts, and swamps isn't something you should do randomly. It has to feel right, and "feeling right" usually means following the logic of the terrain you've already created.
Remember those mountain ranges? The side getting hit with all the wind and rain is the perfect spot for a dense, ancient forest. But the other side, stuck in the "rain shadow," is a natural fit for an arid desert or some sparse, dry plains. It just makes sense.
Swamps and marshes thrive in low-lying areas, especially around river deltas or in flatlands where the water has nowhere to go. Don't just blob in a generic "forest" shape, either. Give it some personality. Is it a magical, ancient wood with impossibly large trees? Or a scraggly, sparse woodland clinging desperately to a mountainside? The way you draw your trees can tell a story all on its own.
Where Civilization Takes Root
With the natural world established, it’s time for people to leave their mark. The placement of your cities and towns is a huge part of your worldbuilding, as a settlement's location tells you nearly everything about its history and purpose.
Think strategically about where people would build.
- At the mouth of a river? That's a prime spot for a major trade hub or capital city, with easy access to both the sea and inland routes.
- Tucked into a mountain pass? You've got yourself a fortress controlling a vital trade route or a mining town digging for riches.
- On a sheltered coastline? A natural harbor is begging for a port city, its fortunes rising and falling with the tides of maritime trade.
I always think of settlements like living things. They need resources to survive and thrive: fresh water, fertile land, a defensible position, and access to trade. If you plop a huge city in the middle of a desert with no water for miles, it just shatters the believability of your world.
Forging Connections With Roads
Roads are the final piece of the puzzle, the arteries that make your world feel interconnected and truly lived-in. Just like rivers, roads follow the path of least resistance. They don't carve a straight line through a mountain range; they wind through the valleys and snake around the steepest hills.
As you draw your roads, try to think like a traveler. A major trade route connecting two capital cities would likely be as direct and well-maintained as the terrain allows. But a path leading to a tiny, remote village? That might just be a faint, winding track. Roads also have to cross rivers, so they'll naturally converge at shallow fords or at the most logical spots for a bridge.
The icons you choose for cities and the style of your roads add another great layer of visual storytelling. A capital might be a grand, spired symbol, while a small village could be a simple dot. This kind of visual hierarchy gives the viewer an instant understanding of your world's power structures. Adding these features is a lot like developing a character; you’re giving the world a history and a unique personality. The principles of good storytelling are universal, and you can see how they apply to character creation in our guide on fantasy character design.
Finishing Your Map with Artistic Flair
This is where the magic really happens. You've laid the groundwork, but the final details are what breathe life into a map, transforming it from a simple diagram into something that feels like a real, storied artifact. It's time to let your personal style and the personality of your world shine through.
Image
Think about the lettering you use for place names. A harsh, runic script can perfectly capture the feel of a rugged northern kingdom. On the other hand, a flowing, elegant font might be a better fit for an ancient elven forest. Don't be shy about inventing your own simple lettering—it’s one of the best ways to give your map a truly unique voice.
Adding Classic Cartographic Elements
Some decorative elements are staples of fantasy map-making for a good reason: they just work. A beautifully drawn compass rose or an ornate cartouche framing your map's title can instantly make the entire piece feel more authentic and full of wonder.
These are more than just decorations; they're opportunities to tell a story.
- Compass Rose: Instead of a simple N-S-E-W, why not use symbols from your world's lore? Maybe the cardinal points are represented by celestial beasts or the sigils of the four founding gods.
- Cartouche: This is the fancy frame around your map’s title. It can be as simple as a weathered scroll or as grand as a royal crest flanked by dragons, hinting at who made the map and why.
- Sea Monsters and Ships: Got a lot of empty ocean? That's not a blank space; it's a canvas. Adding a kraken's tentacles, a fleet of raiding ships, or a winding sea serpent makes the world feel dangerous and full of mystery.
These little touches are narrative hooks. They hint at a world that extends far beyond the edges of the paper. If you're looking for more inspiration, exploring a gallery of fantasy map making ideas can spark some fantastic new concepts for these classic flourishes.
Inking, Coloring, and Aging Your Map
The final inking and coloring choices will set the entire mood. Whether you’re working with pen and paper or a drawing tablet, this is where you lock in the aesthetic. I’ve found that a fine-tipped ink pen, like a 0.1 Micron, is perfect for creating crisp, permanent outlines over your pencil work.
If you want that classic, antique look on physical paper, the old trick of using a light wash of cold coffee or tea really works. Just make sure the paper is completely dry before you start. It gives you a fantastic, convincing parchment effect.
Here’s a pro tip for aging with coffee or tea: don’t be neat about it. A perfectly even stain looks fake. Let some areas pool and darken more than others. The goal is to create a random, weathered look that suggests the map has been on many adventures.
Working digitally gives you a ton of flexibility. You can get a similar aged feel by using textured brushes and layering in high-quality paper textures. Your color palette is also a huge part of the story. Muted, earthy tones can suggest a gritty, low-magic world, while a burst of vibrant, saturated colors might signal a high-fantasy setting overflowing with life.
Common Questions About Drawing Fantasy Maps
As you start your journey into fantasy map-making, you'll inevitably run into a few common hurdles. I've seen these questions pop up again and again, so let's tackle them head-on to keep you moving forward.
What's the Best Map-Making Software?
Honestly, the "best" software is the one that fits your style and what you'm trying to achieve. For years, digital painters have sworn by Photoshop for its incredible brush engine, which is perfect for that organic, hand-painted look. If you're on an iPad, Procreate offers a similar tactile experience.
If you're aiming for crisp, clean lines that can be scaled up for a massive print, a vector program like **Adobe Illustrator** is your best bet. But then there are the specialized tools, which can be a game-changer.
- **Wonderdraft**: This is my go-to for speed. You can generate a continent in seconds and populate it with a huge library of pre-made assets. It’s a lifesaver for RPG campaign prep.
- **Campaign Cartographer**: This one has a steep learning curve, no doubt about it. But if you put in the time, it’s an incredibly powerful tool for creating professional-grade, highly detailed maps.
Dedicated programs like these aren't cheating; they're just different tools designed to get the job done faster.
How Can I Make My Coastlines Look More Realistic?
The biggest giveaway of an amateur map is a coastline that’s too smooth. Real coastlines are messy, jagged, and full of character. An old trick that works wonders is to just scribble a chaotic, looping line on your page without thinking too much. Then, go back and carefully trace the most interesting outer edges of that scribble. You'll be left with a naturally complex and believable shore.
Another classic technique is to drop a handful of rice or dried beans onto the paper and lightly trace around the cluster they form. It's a fantastic way to introduce a bit of randomness that's nearly impossible to create on purpose.
Don't forget to sprinkle in some small islands, bays, and jagged peninsulas. Those little details are what truly sell the effect.
Why Do My Rivers Look... Wrong?
I can almost guarantee it comes down to one thing: rivers don't split on their way to the sea. They only merge. Think of it like a tree, but in reverse—tiny streams (twigs) flow into creeks (small branches), which then flow into larger rivers (the trunk).
Always start your rivers in high-elevation areas, like mountains or hills. From there, have them meander downhill toward a lake or the ocean, always following the path of least resistance. A river will never flow uphill, and it won't cut a continent in half by connecting two oceans. That's a strait, a completely different geographical feature.
Just remembering that rivers combine instead of divide will solve 90% of the problems people have with them.
Ready to overcome artist's block and fill your newly drawn world with fascinating creatures and characters? Drawing List offers an AI-powered idea generator with thousands of unique prompts to spark your next creation. Find endless inspiration at https://www.drawinglist.com.