Every artist, from seasoned professionals to passionate hobbyists, eventually faces the blank page, a canvas of both infinite possibility and daunting emptiness. The quest for fresh, exciting, and cool drawing ideas is a continuous journey that fuels creative growth and keeps the artistic passion alive. Stagnation is the enemy of creativity, but finding the right prompt can reignite your inspiration, push your technical skills, and help you discover new artistic territories.
This roundup is designed to do just that. We've curated a diverse list of nine compelling concepts that span different genres, styles, and difficulty levels. Whether you're looking to master intricate details with hyperrealistic eye studies, explore imaginative worlds through surreal dreamscapes, or design sleek minimalist portraits, this guide offers actionable starting points to break through any creative block.
We will explore each idea with specific tips, examples, and practical insights. Our goal is to help you not just start drawing, but to create something truly unique and impressive. You'll find concepts ranging from cyberpunk portraits and dragon anatomy to geometric animals and steampunk machinery. Get your pencils, pens, or stylus ready, your next favorite artwork starts here.
1. Cyberpunk Portraits
Cyberpunk portraits offer a fantastic opportunity to merge human anatomy with futuristic technology, creating visually stunning characters. This style explores a high-tech, low-life future, characterized by neon-drenched cityscapes, dystopian themes, and cybernetic enhancements. These drawings are more than just sci-fi; they are a commentary on the human condition in a world where technology blurs the line between person and machine. This makes them one of the most compelling and cool drawing ideas for artists looking to practice character design and complex lighting.
How to Approach a Cyberpunk Portrait
Start with a solid foundation in human anatomy. A believable portrait hinges on getting the facial structure, proportions, and expression right before adding any technological elements. Once you have a strong sketch, begin integrating cybernetics. This could be anything from glowing optic nerves and integrated circuitry to mechanical jawlines or holographic data overlays.
A defining feature of the cyberpunk aesthetic is the lighting. Your light sources are often artificial: the glow of a neon sign, a holographic advertisement, or the light from a character's own implants. This creates high-contrast scenes with deep shadows and vibrant, saturated colors.
Pro-Tip: To make your neon colors truly pop, place them against a dark, desaturated background. Use complementary colors, like a bright cyan glow on one side of the face and a magenta or orange backlight on the other, to create dynamic visual tension.
Actionable Tips for Your Drawing
- Focus on a Focal Point: Don't overload your design. Choose one or two key cybernetic features to be the star of the portrait, such as intricate mechanical eyes or glowing lines tracing the veins.
- Study Real-World References: Look at real circuit boards, cables, and mechanical joints to inspire your cybernetic designs. For lighting, study photos of cities at night, like Tokyo or Hong Kong.
- Tell a Story: Think about your character’s background. Are their enhancements for combat, data processing, or a cosmetic choice? The story will inform your design decisions and add depth to your artwork.
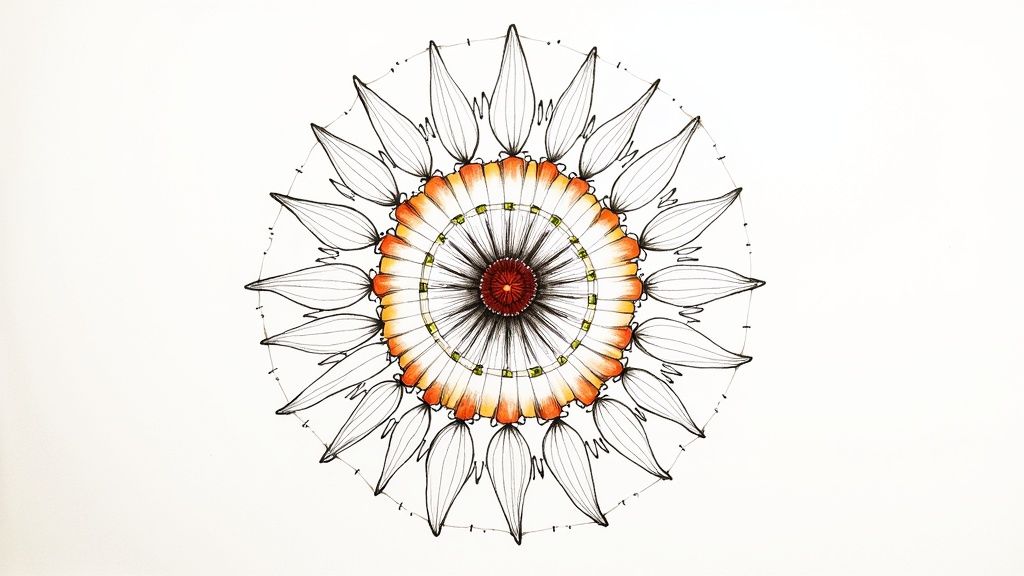
2. Mandala Art
Mandala art offers a deeply meditative and visually striking drawing experience, centered on creating intricate circular designs. These patterns, which radiate from a central point, are built upon symmetry, geometric shapes, and repeating motifs. While rooted in Hindu and Buddhist spiritual traditions as symbols of the universe, modern mandala art has become a beloved practice for artists seeking focus, precision, and creative expression. This makes it one of the most relaxing yet cool drawing ideas for anyone wanting to blend mathematical structure with free-form artistry.
How to Approach Mandala Art
Start with a solid structural foundation. Use a compass to draw a series of concentric circles and a ruler or protractor to divide the circle into equal segments, like slices of a pie. These guidelines will ensure your finished piece is balanced and symmetrical. Begin filling the innermost segments with simple patterns, such as petals, dots, or arches, and repeat them consistently around the center.
The power of a mandala lies in its repetition and gradual increase in complexity. As you move outward to larger rings, you can introduce more detailed patterns, building upon the themes you established near the center. Whether you use traditional symbols, Henna-inspired swirls, or Zentangle-style patterns, the process is as important as the final product.
Pro-Tip: Don't be afraid to leave negative space. Not every segment needs to be filled. White space can help your more intricate patterns stand out and prevent the overall design from feeling too cluttered.
Actionable Tips for Your Drawing
- Start with Simple Tools: You don't need much to begin. A compass, a ruler, a pencil for guidelines, and a fine-tip pen (like a Micron) for the final lines are all you need for a crisp, clean drawing.
- Practice Basic Motifs: Before starting a full mandala, practice drawing small, repeatable patterns on a separate sheet. Get comfortable with creating leaves, scallops, spirals, and geometric shapes.
- Embrace Imperfection: While symmetry is a goal, small inconsistencies are part of the charm of a hand-drawn piece. Focus on the meditative flow of drawing rather than achieving flawless mathematical perfection.
3. Hyperrealistic Eye Studies
Hyperrealistic eye studies are an exceptional exercise in precision, texture, and light, challenging artists to capture the human eye with photographic accuracy. This discipline goes beyond a simple sketch; it involves rendering every minute detail, from the delicate strands of eyelashes and the complex patterns of the iris to the moist sheen of the tear duct. Creating these drawings is a meditative process of observation and control, making it one of the most rewarding and cool drawing ideas for artists aiming to master realism and impress viewers with their technical skill.

How to Approach a Hyperrealistic Eye Study
Begin by sourcing a high-resolution reference photograph. The quality of your reference is critical, as you will need to see every tiny vein, reflection, and skin pore. Lightly sketch the basic shapes: the almond shape of the eye, the circle of the iris, and the placement of the pupil. From there, work in gradual layers, starting with the lightest tones and slowly building up to the darkest shadows using a wide range of graphite pencils (from 2H for faint lines to 8B for deep blacks).
The key to achieving lifelike realism is texture. Use sharp pencils for fine details like eyelashes and iris fibers, and blending stumps or tortillons to create the soft, smooth transitions of the skin. Pay close attention to the catchlight, the bright reflection of a light source in the pupil, as this single detail breathes life into the entire drawing.
Pro-Tip: Don't draw the white of the eye (the sclera) as pure white. Observe your reference closely; it’s full of subtle gray tones, pinkish hues near the corners, and faint shadows cast by the upper eyelid. Capturing these nuances is what separates a good drawing from a great one.
Actionable Tips for Your Drawing
- Render the Iris in Sections: Break the iris down into smaller, manageable sections. Focus on replicating the unique patterns, colors, and textures in one small area at a time before moving on.
- Focus on Reflections: The cornea is a reflective, convex surface. Carefully study and draw what is being reflected in the eye, whether it’s a window, a room, or the sky. This adds incredible depth and realism.
- Vary Your Eyelash Strokes: Avoid drawing uniform, repetitive lashes. Real eyelashes clump together, grow in different directions, and vary in length and thickness. Use quick, confident strokes to mimic this natural imperfection.
4. Surreal Dreamscapes
Surreal dreamscapes invite you to break the rules of reality and draw directly from the depths of your imagination. These compositions blend realistic elements with fantastical scenarios, featuring impossible architecture, floating objects, and distorted perspectives. Inspired by the subconscious mind, surreal art challenges logic and creates visually stunning narratives. Tapping into this style is one of the most creatively freeing and cool drawing ideas, allowing you to explore symbolic themes and push the boundaries of visual storytelling.
How to Approach a Surreal Dreamscape
Begin by grounding your scene with familiar, realistically rendered elements, like a tree, a clock, or a doorway. The power of surrealism comes from the contrast between the ordinary and the impossible. Once you have a realistic anchor, introduce the twist: perhaps the clock is melting, as in Salvador Dalí’s work, or the doorway opens into an empty sky, reminiscent of René Magritte.
Composition is key to making the unbelievable feel intentional. Use strong compositional guides like the rule of thirds or leading lines to guide the viewer’s eye through your fantastical world. Even though the subject matter is bizarre, a well-planned composition prevents the image from feeling chaotic.
Pro-Tip: Keep a dream journal next to your bed. The strange, fragmented narratives from your dreams are a goldmine of surreal inspiration. Don't worry about them making sense; focus on capturing the feeling or a single striking image.
Actionable Tips for Your Drawing
- Combine Unrelated Objects: Juxtapose objects that have no logical connection, like a fish swimming through the clouds or a staircase made of books. This simple technique immediately creates a surreal and thought-provoking mood.
- Play with Scale: Dramatically alter the scale of objects. A tiny elephant in a teacup or a giant key towering over a landscape can transform a mundane scene into a captivating dreamscape.
- Study the Masters: Analyze the works of surrealist pioneers like Salvador Dalí, M.C. Escher, and Giorgio de Chirico. Pay attention to how they use shadow, perspective, and symbolism to build their uncanny worlds.
5. Dragon Anatomy Studies
Dragon anatomy studies are a classic and deeply rewarding exercise for artists who love fantasy and creature design. Instead of simply drawing a generic lizard with wings, this approach involves a detailed exploration of mythical physiology, blending real-world animal anatomy with fantastical elements. By focusing on skeletal structure, muscle definition, scale patterns, and wing mechanics, you can design dragons that feel plausible and powerful. This makes it one of the most engaging and cool drawing ideas for building your creature design skills.
How to Approach a Dragon Anatomy Study
Begin by grounding your design in reality. All believable creatures, no matter how fantastic, are built on principles of anatomy and biology. Study the skeletons of dinosaurs, the muscle groups of large cats or lizards, and the wing structures of bats and birds. This research will provide the blueprint for a dragon that looks like it could actually move, fly, and thrive in its environment.
Next, decide on the type of dragon you want to create. Is it a lithe, serpentine Eastern dragon, a heavily armored European wyvern, or a unique species adapted to a specific habitat like a volcano or an arctic tundra? Its lifestyle will dictate its form. A flying dragon needs powerful pectoral muscles and lightweight bones, while a sea-dwelling serpent might have fins and a more streamlined body. For a deeper dive into different dragon types and concepts, you can find a wealth of dragon drawing ideas on DrawingList.com.
Pro-Tip: Create an anatomical chart. Start with the skeleton, then layer on the major muscle groups, and finally add the skin, scales, and other external features. This layered approach helps you understand how all the parts work together and ensures your final design is cohesive.
Actionable Tips for Your Drawing
- Reference Real Skeletons: Use skeletons of animals like crocodiles, T-Rexes, and eagles as a base. Combine elements from different creatures to create something new but believable.
- Focus on Flight Mechanics: For winged dragons, study bat and bird wings. Bats have elongated finger bones with a skin membrane (patagium), which is a fantastic reference for realistic dragon wings.
- Consider Its Environment: Let the dragon's habitat inform its design. An arctic dragon might have thick, pale scales or fur-like insulation, while a desert dragon could have a sandy color and features that help it conserve water.
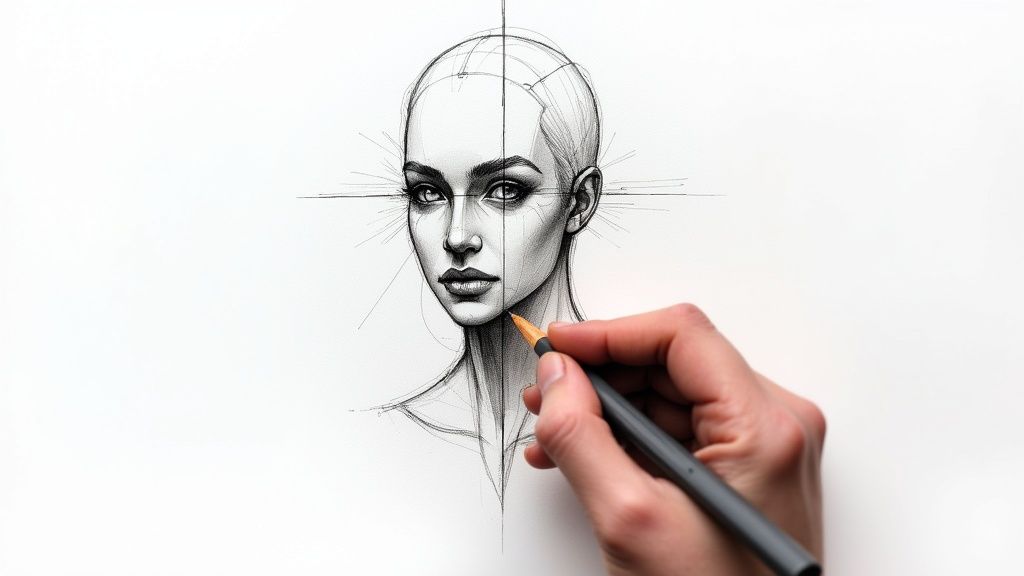
6. Minimalist Line Art Portraits
Minimalist line art portraits are a powerful exercise in precision and expression, challenging artists to capture the essence of a person with the fewest lines possible. This style strips away shading, texture, and complex detail, focusing instead on the core contours and defining features of a face or figure. It’s an elegant and modern approach, proving that simplicity can often be more impactful than complexity, which is why it stands out as one of the most sophisticated and cool drawing ideas for any artist.
How to Approach a Minimalist Line Art Portrait
The key to minimalism is understanding what to leave out. Start with a solid grasp of facial proportions, as every line carries significant weight. Practice continuous line exercises, where your pen or stylus never leaves the page, to train your hand and eye to work in unison. This forces you to see the face as a single, flowing form rather than a collection of separate features.
Focus on capturing a specific emotion or the unique structure of your subject. The curve of a smile, the angle of a brow, or the line of a jaw can define the entire piece. Experiment with line weight: a single, uniform line can feel clean and graphic, while varying thickness can add depth and emphasis to certain areas, like the eyes or lips.
Pro-Tip: Use a photo reference and trace the most important lines on a separate layer or with tracing paper. This helps you identify the essential contours to focus on. Then, try to recreate the portrait from memory, focusing only on those key lines.
Actionable Tips for Your Drawing
- Embrace Negative Space: The empty space around your lines is just as important as the lines themselves. Use it deliberately to define form and create a balanced composition.
- Study the Masters: Look at the line work of artists like Picasso and Matisse. Analyze how they used single, unbroken lines to convey form, movement, and personality with incredible efficiency.
- Focus on the Silhouette: Start by perfecting the outer contour of the head and hair. A strong, recognizable silhouette is often all you need for a compelling minimalist portrait.
- Explore easy drawing ideas to build your foundational skills before tackling more expressive minimalist forms.
7. Steampunk Mechanical Designs
Steampunk mechanical designs blend Victorian-era elegance with fantastical, steam-powered technology, creating a world of retro-futuristic invention. This genre imagines an alternative history where steam power, brass gears, and intricate clockwork became the foundation for everything from flying machines to complex automatons. Drawing these designs is a brilliant exercise in texture, detail, and imaginative engineering, making it one of the most creatively rewarding cool drawing ideas for artists who love history and fantasy.
How to Approach Steampunk Mechanical Designs
Begin by immersing yourself in Victorian aesthetics. Think polished wood, ornate filigree, and heavy iron, combined with the raw power of steam. Your initial sketch should focus on a strong, recognizable silhouette before you add the complex inner workings. Once the basic form is established, start layering in gears, pipes, pressure gauges, and rivets. The key is to make the technology feel tangible and functional, even if it's fantastical.
The materials are central to the steampunk look. Your drawings should emphasize the textures of brass, copper, and wrought iron. Think about how these materials age. Adding patina, rust, and oil stains will give your designs a sense of history and use, making them feel like genuine artifacts from an alternate timeline.
Pro-Tip: To make your machines look functional, create a visual "flow" of power. Use pipes and conduits to connect a boiler or power source to the moving parts, like pistons or rotating gears. This small detail adds a layer of believability to your invention.
Actionable Tips for Your Drawing
- Study Real Victorian Machinery: Look at old steam locomotives, factory equipment, and scientific instruments from the 19th century. This will provide an authentic foundation for your more imaginative creations.
- Combine Function and Fashion: Steampunk is as much about style as it is about function. Embellish your designs with Victorian patterns, elegant curves, and decorative elements alongside the purely mechanical parts.
- Master the Materials: Practice drawing different metallic textures. Use high-contrast shading to capture the shine of polished brass, the dullness of iron, and the rich tones of copper.
8. Galaxy and Space Nebulas
Drawing galaxies and space nebulas is an exercise in capturing the immense, vibrant beauty of the cosmos. This artistic pursuit allows for incredible freedom with color, texture, and light, focusing on the swirling gases and star clusters that populate deep space. Inspired by iconic imagery from the Hubble Space Telescope and artists like Chesley Bonestell, these pieces can be both abstract and realistic. They are one of the most visually rewarding and cool drawing ideas for artists who want to master color blending and create awe-inspiring scenes.
How to Approach a Galaxy or Nebula
Begin with a dark background, typically black or deep indigo, to represent the void of space. This base layer will make your subsequent colors appear more luminous. Using soft media like chalk pastels, charcoal, or digital airbrushes, start blocking in the main shapes of your nebula. Focus on creating organic, cloud-like forms rather than sharp, defined edges.
The key to a believable nebula is layering. Gradually build up your colors, starting with mid-tones and slowly adding lighter, more intense hues. Blend these colors seamlessly to create a sense of gaseous depth. Don't be afraid to use unexpected color combinations; real nebulas often feature brilliant pinks, blues, and golds. Learn more about capturing these cosmic scenes with our detailed space drawing ideas.
Pro-Tip: To create realistic star fields, spatter white ink or paint onto your drawing using a stiff brush or a toothbrush. Vary the size and density of the splatters to mimic the look of distant and nearby stars. For larger, brighter stars, add them individually with a fine-point pen or brush.
Actionable Tips for Your Drawing
- Study Real References: Look at photographs from the Hubble or James Webb telescopes. Pay close attention to the way colors interact and how light emanates from within the gas clouds.
- Use an Eraser as a Drawing Tool: With soft media like charcoal or pastels, a kneaded eraser can be used to lift pigment, creating wispy tendrils and bright hotspots within your nebula.
- Create Depth with Layers: Place some star clusters in front of your nebula and others behind it. Overlapping elements will give your cosmic scene a powerful sense of three-dimensional space.
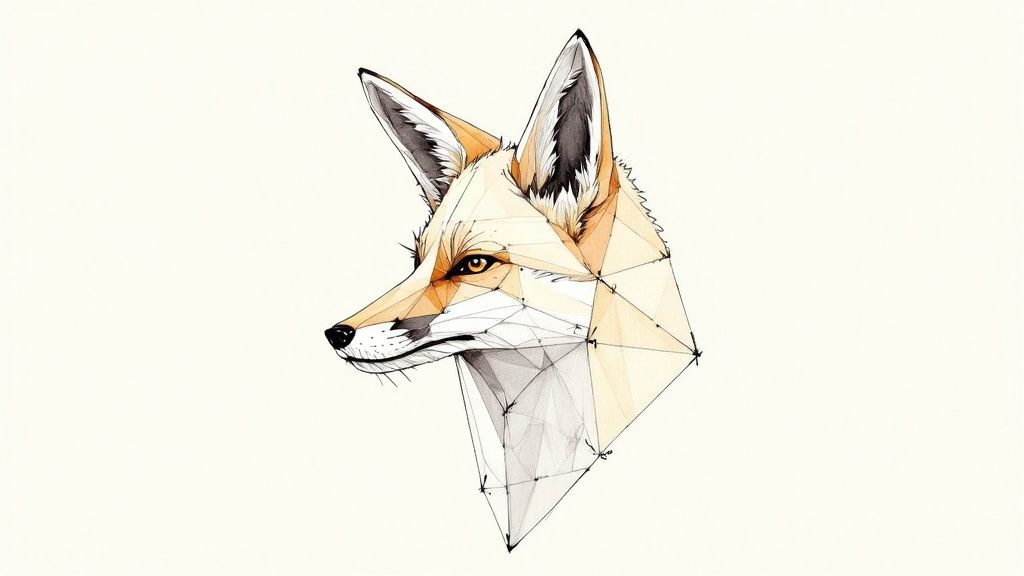
9. Geometric Animal Portraits
Geometric animal portraits fuse the organic beauty of wildlife with the crisp precision of mathematical shapes. This style involves breaking down an animal's form into a network of polygons, lines, and angles, creating a modern and stylized representation. The result is a striking piece of art that feels both analytical and natural, appealing to minimalist tastes while celebrating the complexity of animal anatomy. This technique is one of the most visually satisfying and cool drawing ideas for artists who enjoy structure, pattern, and clean lines.
How to Approach a Geometric Animal Portrait
Begin with a reference photo of your chosen animal and lightly sketch its basic silhouette and key features, such as the eyes, nose, and ears. Instead of rendering smooth curves and fur, start overlaying this sketch with a mesh of geometric shapes, primarily triangles (a technique known as triangulation). Connect major points of the animal’s anatomy, like the tip of the ear to the corner of the eye, to create the foundational lines of your polygon network.
The goal is to simplify complex forms into a mosaic of flat planes. This process transforms fur, muscle, and bone into a structured, low-poly-style illustration. The final artwork can be left as line art or filled with a limited color palette to emphasize the distinct shapes.
Pro-Tip: For a more dynamic look, vary the size and density of your polygons. Use smaller, more complex shapes in areas of high detail like the eyes and nose, and larger, simpler shapes for broader areas like the body or neck. This creates a clear focal point and visual hierarchy.
Actionable Tips for Your Drawing
- Maintain Recognizable Features: Even though the style is abstract, ensure the animal's core characteristics are clear. The silhouette and placement of key features like eyes and ears are crucial for an identifiable portrait.
- Start with Simple Subjects: If you're new to this style, begin with animals that have strong, defined silhouettes, such as a wolf's head, a bird, or a cat. Their distinct shapes are easier to translate into polygons.
- Limit Your Color Palette: A cohesive and modern look is often achieved with a limited color palette. Try using analogous colors or different shades of a single hue to fill in the polygons, which helps unify the design.
Creative Drawing Styles Comparison
Art Style | Implementation Complexity | Resource Requirements | Expected Outcomes | Ideal Use Cases | Key Advantages |
|---|---|---|---|---|---|
Cyberpunk Portraits | High (complex lighting, detail) | Digital tools recommended | Visually striking, futuristic | Sci-fi, gaming, social media | Creative tech integration, popular |
Mandala Art | Moderate (precision, symmetry) | Basic drawing tools | Meditative, intricate patterns | Relaxation, spiritual art | Stress-relieving, accessible |
Hyperrealistic Eye Studies | Very high (photorealism skill) | High-quality materials needed | Photographic accuracy, skill boost | Skill-building, demos, portraits | Impressive detail, fundamental skills |
Surreal Dreamscapes | High (composition, imagination) | Varied tools | Unique, imaginative narratives | Concept art, storytelling | Unlimited creativity, broad appeal |
Dragon Anatomy Studies | High (anatomy, detail) | References, technical knowledge | Believable fantasy creatures | Fantasy art, gaming concepts | Combines realism with fantasy |
Minimalist Line Art | Low to moderate (line control) | Minimal tools | Elegant, modern simplicity | Beginner practice, branding | Quick, accessible, stylish |
Steampunk Mechanical | High (mechanical detail, design) | Technical and historical refs | Intricate, retro-futuristic art | Maker communities, literature | Rich texture, historical creativity |
Galaxy and Space Nebulas | Moderate (blending skills) | Blending materials advised | Spectacular cosmic visuals | Color theory practice, relaxation | Forgiving for beginners, meditative |
Geometric Animal Portraits | Moderate to high (geometry focus) | Digital/drawing tools | Modern, abstract wildlife art | Digital art, logos, tattoos | Trendy, teaches shape simplification |
Transforming Inspiration into Creation
The journey from a blank page to a finished piece of art is powered by inspiration. The collection of cool drawing ideas we've explored is designed to be more than a simple list of prompts; it's a launchpad for your artistic journey. These concepts are gateways to developing new skills, exploring unique styles, and telling compelling visual stories.
From the intricate details of steampunk mechanics to the serene, symmetrical beauty of a mandala, each idea presents a distinct challenge. Tackling the technical precision of a hyperrealistic eye builds your observational skills, while creating a surreal dreamscape pushes the boundaries of your imagination. The ultimate value lies not in mastering every single one, but in discovering which paths ignite your passion and drive your growth.
Turning Concepts into Canvases
The key takeaway is that inspiration is an active pursuit. It isn't about waiting for a lightning bolt of creativity. It's about taking a concept, like a geometric animal portrait or a dynamic dragon anatomy study, and asking "what if?" What if you blended the neon aesthetics of cyberpunk with the organic forms of a dragon? What if you placed a minimalist line art portrait inside a swirling space nebula?
The most powerful artistic habit you can build is the one that gets you to start. Don't let the fear of imperfection paralyze you. Pick an idea that excites you, grab your pencil or stylus, and allow yourself the freedom to experiment, make mistakes, and learn through the act of doing.
Your Actionable Path Forward
To truly integrate these concepts and build momentum, consider these next steps:
- The 7-Day Challenge: Pick one idea from this list and dedicate a small amount of time each day for a week to developing it. Day one might be rough sketches, day three could be refining the line work, and by day seven, you could be adding color and final details.
- The Fusion Project: Choose two completely different ideas from our list, such as "Mandala Art" and "Cyberpunk Portraits." Spend a brainstorming session sketching out ways to combine them into a single, cohesive piece. This exercise is fantastic for developing a unique artistic voice.
- The Skill-Based Focus: Identify a technical skill you want to improve, whether it's rendering light, understanding perspective, or mastering clean lines. Select the drawing idea from this list that best serves as a practice ground for that specific skill.
Ultimately, the goal is to cultivate a consistent and joyful creative practice. These cool drawing ideas are your starting blocks. Use them as a foundation, then build upon them, twist them, and combine them to create something that is uniquely yours. The world is full of incredible visuals, and with these prompts, you now have a map to begin capturing them.
Ready for an endless supply of unique prompts to defeat artist's block for good? Visit Drawing List and use our AI-powered generator to discover thousands of cool drawing ideas tailored to your interests. Keep your creativity flowing and find your next masterpiece at Drawing List.