Build Your Skills: A Foundation for Artistic Growth
Every great artist, from Renaissance masters to modern animators, shares a common secret: consistent, focused practice. Simply waiting for inspiration to strike is a myth; true skill is forged through deliberate effort and repetition. This guide moves beyond vague advice, offering a curated set of fundamental drawing practice exercises designed to build a rock-solid foundation for your artistic journey. Each exercise targets a specific skill, from capturing life and movement with gesture drawing to understanding form and light with value studies.
Whether you're a complete beginner aiming to fill your first sketchbook or an experienced artist looking to sharpen your fundamentals, these targeted drills provide a structured path to tangible improvement. We will break down each technique step-by-step, providing actionable tips and real-world context to help you integrate them into your daily routine. This collection of exercises covers essential areas like contour drawing, perspective, figure drawing, and more. Prepare to transform your approach from aimless doodling to purposeful practice and watch your confidence and abilities soar as you build a reliable, versatile skill set.
1. Gesture Drawing
Gesture drawing is a foundational technique focused on capturing a subject’s essence, movement, and form in a matter of seconds or minutes. Unlike detailed, rendered drawings that can take hours, a gesture sketch is a rapid study, typically lasting from 30 seconds to five minutes. The primary goal is not to create a perfect likeness but to understand and express the dynamic energy, flow, and rhythm of the pose. It’s one of the most vital drawing practice exercises for building a strong sense of form, proportion, and movement.
This method was popularized by masters like Kimon Nicolaïdes in his book "The Natural Way to Draw" and has been a staple in the training of animators at studios like Walt Disney since their earliest days. The idea is to see the subject as a whole, a connected system of energy, rather than a collection of individual parts. This approach trains your brain to quickly identify the most important lines and shapes that define a pose.
How to Practice Gesture Drawing
To begin, find a source of poses. Websites like Line of Action or Quickposes offer timed photo references, which are perfect for this exercise.
- Start with the "Line of Action": Before drawing any limbs or features, identify the main curve or line that runs through the figure's spine, from the head to the feet. This single, expressive line establishes the entire pose's energy and direction.
- Use Your Whole Arm: Avoid drawing with just your wrist. Stand up if possible and use your shoulder and elbow to make long, fluid strokes. This promotes a more dynamic and less rigid drawing style.
- Focus on Flow, Not Details: In a 60-second pose, you have no time for facial features or individual fingers. Instead, concentrate on the relationship between the head, ribcage, and pelvis. Use simple shapes like circles and ovals to represent these major masses.
- Vary Your Timing: Begin with 2-minute poses to give yourself time to observe. As you get more comfortable, challenge yourself with 60-second and then 30-second intervals. Shorter durations force you to be more decisive and economical with your lines.
Practicing gesture drawing daily, even for just 15 minutes, will dramatically improve your ability to create characters that feel alive and dynamic, rather than stiff and wooden. It’s an essential warm-up and a powerful skill-building drill for any artist.
2. Contour Drawing
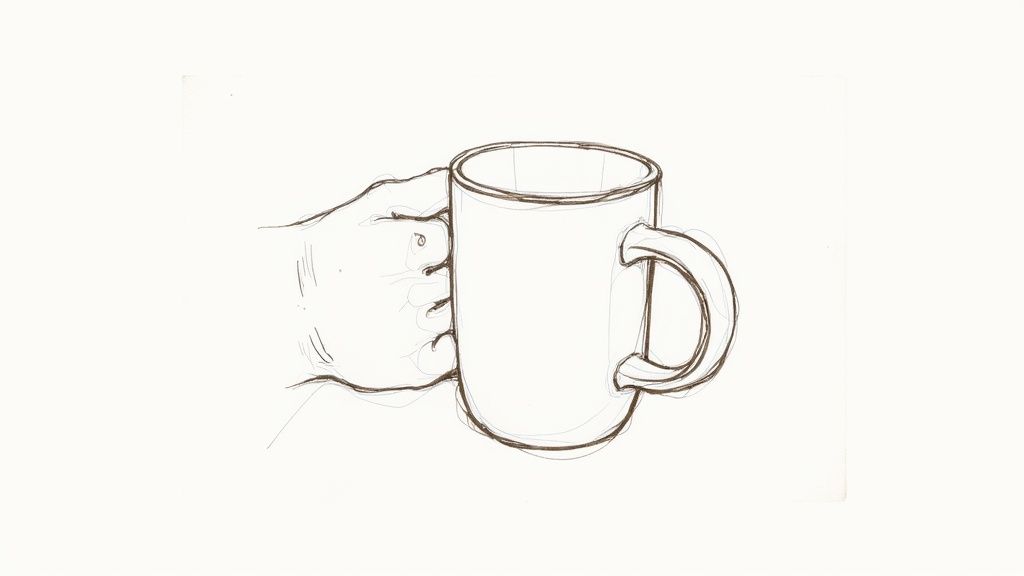
Contour drawing is a classic artistic exercise that trains your hand to record exactly what your eye sees. It focuses on the "contour," or the outline and visible edges of a subject. Unlike other drawing methods, the emphasis is not on speed or form but on pure, intense observation. The goal is to synchronize your hand's movement with your eye's movement, creating a deep connection between observation and action. This is one of the most effective drawing practice exercises for sharpening your observational skills and breaking the habit of drawing what you think you see.
This technique was heavily championed by Betty Edwards in her influential book, "Drawing on the Right Side of the Brain," where it's used to help students bypass the symbolic, analytical left side of the brain and engage the more spatial, intuitive right side. The result is often a strangely distorted yet incredibly detailed drawing that captures the true perceived nature of the object. Artists from Henri Matisse to Alberto Giacometti have used contour lines as a fundamental part of their work, proving its value beyond a mere exercise.
How to Practice Contour Drawing
The beauty of contour drawing is its simplicity; all you need is a subject, a pen, and paper. Your own non-drawing hand is a perfect starting point.
- Choose a Variation: The most famous version is blind contour drawing, where you draw the subject without ever looking at your paper. A modified contour allows for occasional glances at your paper to reorient yourself. Start with the modified version if blind contour feels too intimidating.
- Move Slowly and Deliberately: Imagine your pencil tip is an ant crawling along the edges of your subject. Trace every tiny nook, cranny, wrinkle, and fold with your eye, and let your hand follow at the exact same pace. The process should feel slow and almost meditative.
- Draw One Continuous Line: Try to complete the drawing without lifting your pen from the paper. This forces you to find pathways between different edges and reinforces the idea that all parts of the subject are connected.
- Trust the Process, Not the Result: The final drawing will likely look "wrong" or disproportionate, and that's the point. The value of this exercise is in the process of observation, not in creating a polished final product. Resisting the urge to judge your work is part of the training.
Dedicating just 10-15 minutes to contour drawing before a main drawing session can dramatically improve your focus and perceptual accuracy. It’s an essential practice for any artist looking to build a stronger foundation in observation.
3. Value Studies
Value studies are a fundamental practice focused on understanding and rendering light, shadow, and form using only different shades of gray or a single color. This exercise forces an artist to see beyond color and focus entirely on luminance, which is how light or dark a surface appears. By translating a scene into a limited range of tones, you learn how light travels across objects, creates shadows, and defines three-dimensional form on a two-dimensional plane. This is one of the most crucial drawing practice exercises for creating depth, mood, and realism in your work.
This method has been a cornerstone of art education for centuries, mastered by artists like Rembrandt and Leonardo da Vinci, who used stark light and shadow (chiaroscuro) to create dramatic, emotionally charged scenes. In more modern contexts, instructional authors like Andrew Loomis heavily emphasized value control as the key to convincing form. It’s an essential preliminary step for painters, illustrators, and even storyboard artists, who use value to establish a film's visual tone and lighting design.
How to Practice Value Studies
To begin, set up a simple still life with a single, strong light source to create clear highlights and shadows. A desk lamp pointed at an apple or a white mug is a perfect starting point.
- Create a Value Scale: Before you start drawing, create a reference scale with 5 to 7 distinct shades, from pure white to solid black. This will help you map the values you see in your subject to the values you put on paper.
- Squint Your Eyes: Squinting at your subject is a classic artist's trick. It blurs out distracting details and simplifies the scene into large, abstract shapes of light and shadow. This makes it much easier to identify the main value relationships.
- Work from Mid-Tones: Start by lightly blocking in the mid-tone values across your drawing, leaving the areas of brightest highlight as the white of the paper. Then, gradually build up the darker shadow areas. This prevents you from making your darks too dark, too quickly.
- Focus on Form, Not Line: Try to build your drawing using blocks of tone rather than outlines. Let the edge where a light shape meets a dark shape create the form. This trains your brain to think in terms of mass and volume.
Regular practice with value studies will fundamentally change how you see the world, allowing you to create drawings with a powerful sense of weight, atmosphere, and three-dimensional reality.
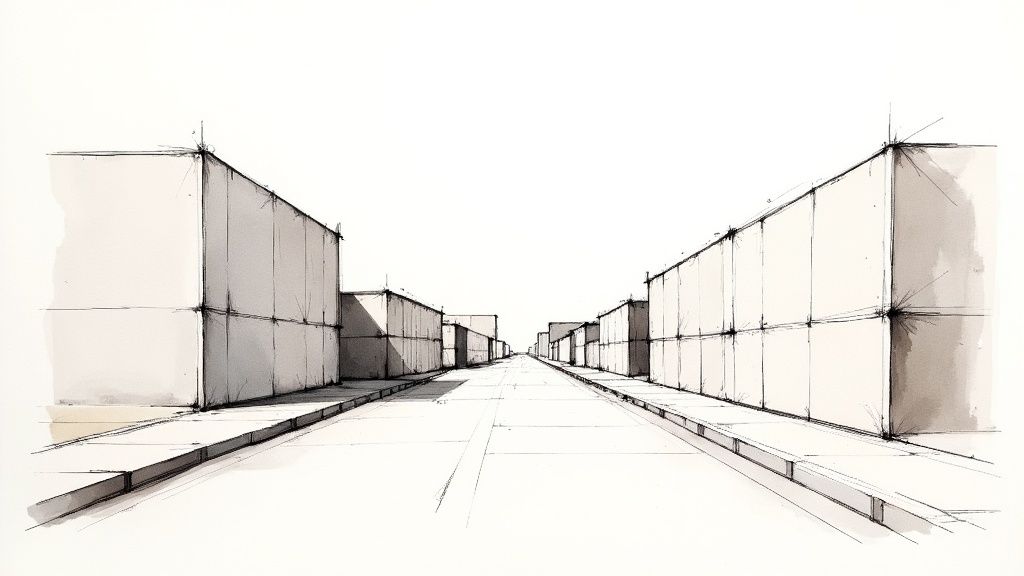
4. Perspective Drawing Exercises
Perspective drawing is the technical method used to create a realistic illusion of three-dimensional depth on a two-dimensional surface. It relies on a system of vanishing points and horizon lines to ensure that objects appear to recede into the distance correctly. Mastering this skill is non-negotiable for drawing convincing environments, architecture, and objects. It’s one of the most fundamental drawing practice exercises for moving beyond flat, symbolic representations and creating immersive, believable worlds.
The principles of linear perspective were formally codified during the Renaissance by architects like Filippo Brunelleschi and have since become a cornerstone of realistic art. From complex cityscapes in comic books and video game concept art to the simple accuracy of a still life, perspective provides the underlying structure for a scene. Modern masters like Scott Robertson and the late Kim Jung Gi have demonstrated how a deep understanding of perspective allows for incredible creative freedom.
How to Practice Perspective Drawing
The best way to learn is by starting with the basics and progressively adding complexity. A ruler is your best friend when beginning these exercises.
- Master One-Point Perspective First: Start by drawing a horizon line and placing a single vanishing point on it. Now, draw several squares and rectangles on your page. Connect the corners of each shape back to the single vanishing point using light lines. This will transform your 2D shapes into 3D boxes, giving you a tangible feel for how the system works.
- Move to Two-Point Perspective: This is used for viewing objects from an angle or corner. Draw a horizon line and place two vanishing points on it, far apart from each other. Draw a single vertical line for the front corner of a box, then connect the top and bottom of that line to both vanishing points. This creates the guidelines for the sides of your box.
- Draw "Through" Objects: When practicing, imagine your objects are made of glass. Draw all the lines, even the ones that would normally be hidden from view. This forces you to understand the complete three-dimensional form of the object, not just its visible surfaces.
- Apply It to Real Life: Take your sketchbook outside and find a simple building or a street corner. Identify the horizon line (usually at your eye level) and find the vanishing points. Try to sketch the scene, focusing on the major architectural lines first. This is a powerful way to connect theory with observation.
Regularly engaging in these structured perspective drills will build the foundational logic you need to construct any scene from imagination. It provides the grammar for the language of drawing, allowing you to create compositions that are not just imaginative but also structurally sound and visually convincing.
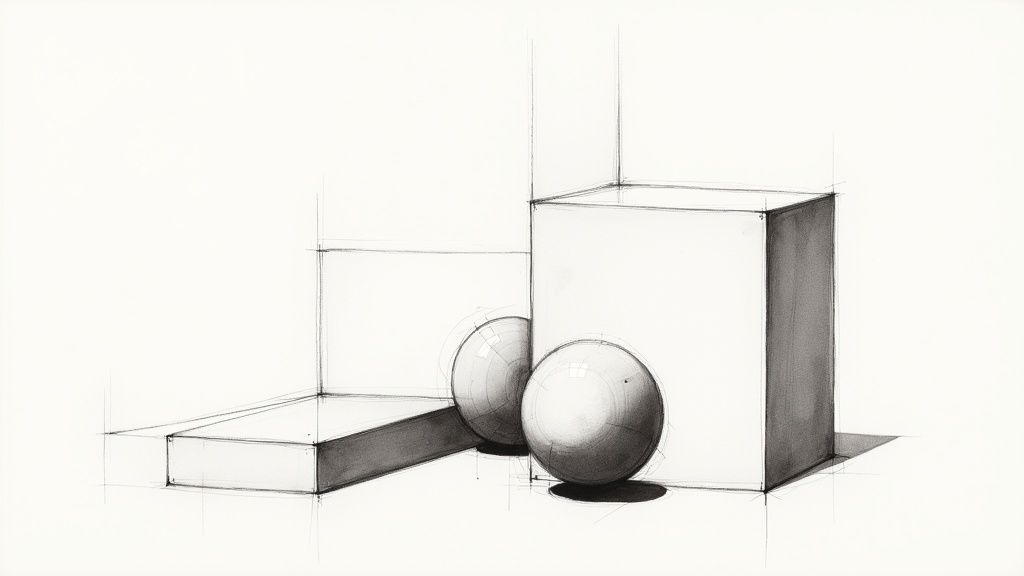
5. Still Life Drawing
Still life drawing is the classic practice of arranging and drawing inanimate objects. It is a fundamental exercise that allows an artist to have complete control over their subject matter, lighting, and composition. Unlike figure drawing or urban sketching, the subjects don't move, giving you ample time to focus on core skills like proportion, value, texture, and form. This deliberate, slow-paced practice is one of the most effective drawing practice exercises for developing observational accuracy and rendering skills.
This tradition has been a cornerstone of artistic training for centuries, seen in the masterful compositions of Jean-Baptiste-Siméon Chardin and the minimalist arrangements of Giorgio Morandi. By setting up your own scene, you act as both director and artist, making conscious decisions about how elements interact. This exercise trains your eye to see the world in terms of shapes, light, and shadow, translating a three-dimensional scene onto a two-dimensional surface.
How to Practice Still Life Drawing
To get started, simply gather a few objects from around your home and arrange them on a table. A single light source, like a desk lamp, will create clear and consistent shadows.
- Start with Simple Forms: Begin with basic geometric objects like boxes, balls, and cylinders (or household items like books, fruit, and cans). This helps you focus on perspective and form without being overwhelmed by complex details.
- Vary Textures and Surfaces: As you progress, create arrangements that include a mix of materials: something reflective like glass, something soft like fabric, and something rough like wood. This challenges you to accurately depict different surface qualities.
- Master Composition: Don't just place objects randomly. Think about the rule of thirds, leading lines, and balance. Sketch a few small thumbnail compositions to plan your arrangement before starting the final drawing.
- Use a Viewfinder: Create a simple viewfinder by cutting a rectangle out of a piece of paper. Looking at your still life through this window helps you isolate your composition and accurately judge angles and proportions. You can find inspiration and explore some simple still life ideas on drawinglist.com.
Regularly practicing still life drawing sharpens your observational abilities immensely. It builds the patience and precision needed for more complex subjects and serves as a quiet, meditative way to improve your fundamental art skills.
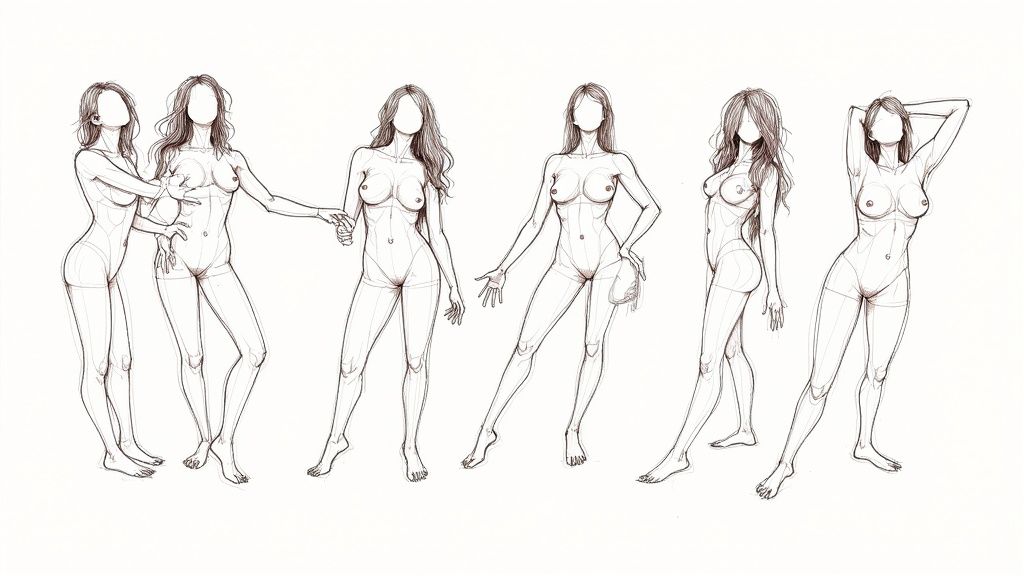
6. Figure Drawing
Figure drawing is the time-honored practice of drawing the human form, traditionally from a live model. It is a comprehensive discipline that synthesizes nearly every fundamental drawing skill, including gesture, proportion, anatomy, perspective, and value. Unlike gesture drawing, which focuses on rapid impressions of movement, figure drawing aims for a more sustained and accurate representation of the body. It is one of the most challenging yet rewarding drawing practice exercises an artist can undertake to master the complexities of human anatomy and form.
This classical training method has been central to artistic education for centuries, practiced by masters from Leonardo da Vinci and Michelangelo to modern realists in ateliers like the Watts Atelier. The process forces an artist to translate a complex, three-dimensional subject onto a two-dimensional surface, improving observational skills and an intuitive understanding of weight, balance, and structure. Regular practice moves an artist from simply copying what they see to truly understanding and interpreting the human form.
How to Practice Figure Drawing
Joining a local life drawing session at a community art center or university is the ideal way to practice, but you can also use high-quality photo references.
- Build from Gesture: Always begin a figure drawing with a quick gesture sketch. This establishes the overall flow and energy of the pose before you commit to anatomical details. A strong gestural foundation prevents the final drawing from feeling stiff.
- Study Proportions and Anatomy: Familiarize yourself with basic human proportions, like the "eight heads tall" ideal, and the major muscle groups. You don't need to be a doctor, but knowing where the major bones and muscles are will make your drawings more convincing.
- Use Construction Lines: Use simple shapes like cylinders for limbs, a sphere for the cranium, and blocky forms for the ribcage and pelvis. These underlying construction lines help you maintain accurate proportions and perspective as you build up the drawing. Find inspiration by exploring pose ideas for drawing on drawinglist.com.
- Focus on Long Poses: While short poses build speed, longer sessions (20 minutes to several hours) are where you truly learn. They allow time to refine contours, study the play of light and shadow (chiaroscuro), and render form with greater accuracy.
Engaging in figure drawing is a direct path to improving your character art, illustration, and overall draftsmanship. It trains your eye to see form, structure, and nuance in a way few other exercises can, providing a solid foundation for any artistic pursuit involving the human body.
7. Line Quality Exercises
Line quality refers to the character and expressiveness of your lines, from their thickness and darkness to their speed and texture. Dedicated line quality exercises are a fundamental practice focused on developing confident, controlled, and varied mark-making. Instead of drawing a subject, the goal is to practice the lines themselves. This is one of the most direct drawing practice exercises for building the muscle memory and dexterity needed for clean, intentional artwork.
This type of training is a cornerstone of many disciplines. Traditional art academies, technical drafting courses, and calligraphy masters all emphasize line control as a non-negotiable skill. Modern masters like comic artist Kim Jung Gi demonstrated legendary line confidence that came from countless hours of this foundational work. By focusing solely on the physical act of making a mark, you train your hand to become a more precise and expressive tool.
How to Practice Line Quality
Set aside a blank sheet of paper specifically for these drills. The goal is consistency and control, not creating a finished piece.
- Draw Parallel Lines and Curves: Fill a page with straight, parallel lines without using a ruler. Practice them horizontally, vertically, and diagonally. Then, do the same with smooth, consistent curves and S-curves. This builds incredible control.
- Practice Varying Line Weight: Draw a single, long line that transitions smoothly from whisper-thin to thick and bold, then back to thin again. This is achieved by varying the pressure you apply to your pen or pencil. Mastering this gives your drawings depth and dimension.
- Hatching and Cross-Hatching: Create small squares and fill them with uniform hatching (parallel lines) and cross-hatching (overlapping sets of lines). Aim for consistent spacing and angle. This is essential for rendering value and texture.
- Try Different Tools: Don't just stick to a pencil. Practice these drills with a ballpoint pen, a fine-liner, and a brush pen. Each tool responds differently to pressure and speed, broadening your mark-making vocabulary. For more guidance on applying these skills, you can find a good starting point in a hand-drawing tutorial on drawinglist.com.
Making line quality exercises a daily 10-15 minute warm-up will have a profound impact on your overall drawing ability. It transforms shaky, uncertain lines into confident, deliberate strokes, which is the foundation upon which all great drawings are built.
7 Essential Drawing Exercise Comparison
Drawing Technique | Implementation Complexity | Resource Requirements | Expected Outcomes | Ideal Use Cases | Key Advantages |
|---|---|---|---|---|---|
Gesture Drawing | Low to moderate | Minimal (paper, pencil) | Capture movement, flow, and essence quickly | Life drawing, animation, sports sketches | Builds speed, spontaneity, and confidence |
Contour Drawing | Low | Minimal | Improved observation and hand-eye coordination | Beginners, mindfulness, foundational practice | Enhances focus and observation |
Value Studies | Moderate | Good lighting, grayscale tools | Understanding light, shadow, and form | Realistic drawing, portrait, still life | Strengthens tonal understanding and composition |
Perspective Drawing Exercises | Moderate to high | Ruler, pencil, optionally grid | Convincing depth and spatial illusion | Architecture, backgrounds, complex scenes | Essential for 3D space representation |
Still Life Drawing | Moderate | Subject objects, controlled setup | Accurate representation of texture, form, and value | Composition practice, texture study | Develops patience and lighting control |
Figure Drawing | High | Live models or references | Advanced anatomy, proportion, and observation | Human form studies, character design | Comprehensive skill-building |
Line Quality Exercises | Low | Basic drawing tools | Improved control, variety, and confidence in lines | Warm-ups, foundational skills | Builds fundamental mark-making skills |
Turning Practice into Progress: Your Next Steps
We have explored a powerful set of seven foundational drawing practice exercises, each designed to isolate and strengthen a crucial artistic skill. From capturing the kinetic energy of a subject with gesture drawing to defining its form with contour lines, and from building three-dimensional realism through value studies to creating believable space with perspective grids, these drills are the building blocks of artistic mastery. You have the tools to deconstruct any subject, understand its structure, and render it with confidence.
The journey from aspiring artist to skilled draftsperson is not a sprint; it is a marathon built on consistent, deliberate effort. The true value of these exercises is unlocked when they transition from a checklist of tasks into a sustainable, lifelong habit. Think of them not as separate assignments but as interconnected components of a holistic practice. The fluid lines you develop in gesture drawing will inform your figure work, and the control you gain from line quality drills will make your still life compositions more compelling.
Integrating Practice into Your Creative Routine
The key to substantial growth is consistency. Committing just 15-30 minutes each day to focused practice will yield more significant results over time than a single, multi-hour session once a month. To make this commitment manageable and effective, consider structuring your week.
- Monday: Warm up with 10 minutes of gesture drawing.
- Tuesday: Focus on a single object with blind and modified contour drawing.
- Wednesday: Create a simple value scale, then apply it to a geometric shape.
- Thursday: Practice one-point perspective by drawing a room or a street.
- Friday: Set up a small still life and spend your session observing and rendering.
This structured approach removes the guesswork and builds momentum. You are not just randomly sketching; you are actively engaging in drawing practice exercises that build muscle memory, sharpen your observation, and systematically expand your creative toolkit. The goal of each session should not be a finished masterpiece, but rather the focused act of learning and improving.
The Power of Purposeful Repetition
Mastering these concepts is valuable because it moves you beyond simply copying what you see. It empowers you to understand whythings look the way they do. This deeper understanding allows you to draw from imagination, to stylize with intent, and to communicate your unique vision effectively. Every page you fill in your sketchbook with these drills is a step toward artistic independence and a testament to your dedication.
Embrace the process, celebrate the small victories, and remember that every line you draw is a word in your developing visual language. Keep your sketchbook close, your pencils sharp, and your curiosity alive. The path is clear; all that remains is for you to walk it, one deliberate mark at a time.
To ensure your practice never becomes stale, you need a constant source of fresh challenges. The Drawing List ideas generator provides endless, high-quality prompts for figure poses, still life arrangements, and unique concepts tailored to keep your creative engine running. Stop wondering what to draw and start practicing with purpose by visiting Drawing List today.